How to Mine NEM (XEM) | A Beginner’s Guide

In this article, you can learn quickly and correctly how to mine NEM (XEM), but before you learn the steps, it’s better to check out some general information.
Table of Contents
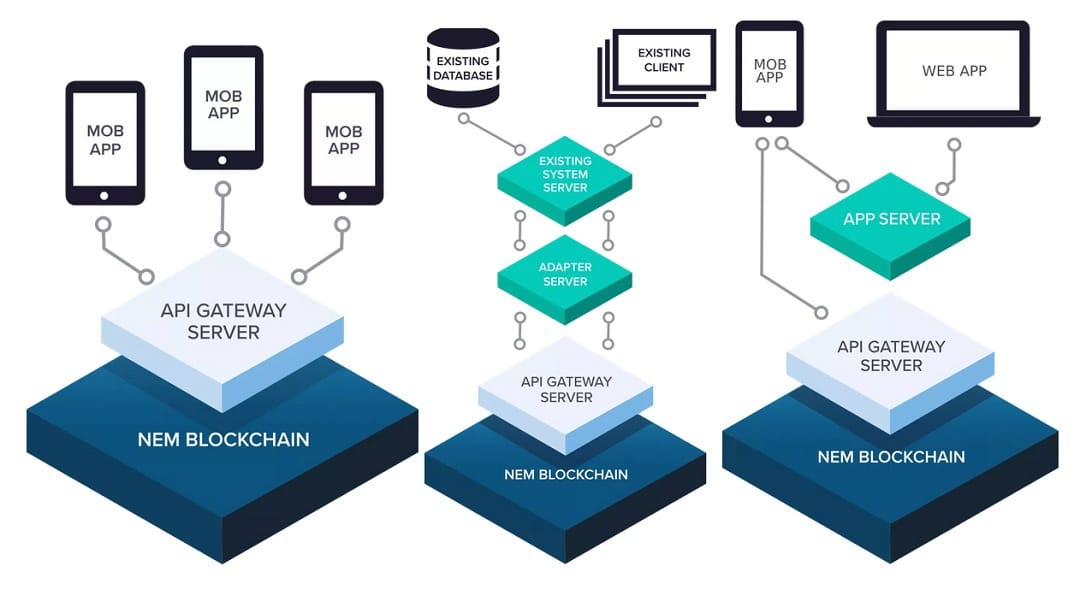
New Economy Movement (NEM) is a blockchain that poses similar functionalities to Ethereum, designed for business enterprise use.
XEM is the token that powers the NEM platform. XEM has a total supply of 8,999,999,999, with all the tokens having been issued in the genesis block. The coin currently ranks 22nd according to a market cap of $1,076,183,999 USD. XEM has a current trading price of $0.119576 USD.
Learn how Python is accelerating blockchain development.
Proof of Importance (PoI)
The NEM blockchain platform uses a proprietary protocol called Proof of Importance to manage how the nodes compete and verify the next block. This order relies on the “importance” of each node which is determined by a score, consisting of factors, such as the number of coins held, number of transactions in the last month, and other details.
NEM’s PoI algorithm is a modified algorithm of Eigentrust++, which is a system for measuring reputation on peer-to-peer networks. It works by enabling nodes to monitor other nodes on the network and create a reputation for them relying on their past actions.
Harvesting and Vesting
PoI determines what users are able to “harvest” NEM blocks. Harvesting blocks involves recording blocks to the chain and earning XEM rewards. There are two types of harvesting: local harvesting mode and delegated harvesting.
In both cases, it is still required to use the mining NEM (XEM) option for harvesting which is unrelated to their importance score. The downside is that you can’t just buy extra XEM on an exchange and start harvesting right away.

As you deposit new coins into your NEM wallet, they enter in the “unvested” category. 10% of the deposited funds are transferred on a daily basis to the “vested” category. After you have over 10,000 vested XEM in your wallet, the harvesting process will begin. As an example, if you have 20,000 XEM, the vesting process might take a week or so.
Local harvesting involves using the default settings on their own server instead of NIS (NEM Infrastructure Server). There are three rules required for local harvesting:
- The users are required to click on the “start local harvesting” button
- The users must be online
- They cannot use NIS while they are harvesting
Another type is delegated harvesting. It lets NEM holders use a remote server to do their work by transferring their importance score to a proxy. Another important difference is that they can collect NEM, while a computer is turned off due to the program transferring the importance to the other node.
The three rules which apply to this type of harvesting are:
- The collecting of coins works non-stop
- There is a lower power consumption when NIS is in function
- Account activation can require a few hours (around six), and a price of 6 XEM.
As you might have noticed by now, the process of mining XEM is not like other cryptos, in the sense that you use your computing power to produce blocks like with Proof of Work protocol coins.
But for those of you who are still keen on mining NEM with graphic cards or ASICs, there is the option to mine other altcoins and then automatically convert them into XEM at their exchange rates before they are sent to the wallet.

How to Mine NEM (XEM) – Steps
Step 1. Create XEM Wallet
You will need to first create a wallet account that supports XEM storage and harvesting. Here you will be sending your XEM. There are a few options currently available: NEM NanoWallet, NEM Mobile Wallet and NCC (NEM Community Client).
Step 2. Select a Miner
There are various mining software platforms that mine a number of altcoins, either for solo mining, pool mining or cloud mining. Some examples are MinerGate, BFGMiner, EasyMiner, CGMiner, etc. Look for the ones that are compatible with your computer’s operating system, then download and install them.
Step 3. Select Your Type of Mining
There are several options through which one can mine cryptocurrency. Some are more profitable than others, but you have to select the one that is most suitable for you and your situation.
CPU Mining
In the first days of cryptocurrency, many people could use CPU to mine. You can download the client and turn on the smart mining feature that will automatically mine the coin that has the most profitability at the moment.
JavaScript Mining
If you do not want to clutter your disk space with downloads, you can opt for JavaScript mining. You just have to access the “Web Mining” tab of MinerGate and turn on Monero mining. Monero has been found to be the most profitable coin via JavaScript mining. In order to keep mining, you will have to keep the page open. This mining NEM option still uses your CPU for computations.
GPU Mining
GPU mining is considered the most profitable option as they are significantly more powerful at solving computational problems than a CPU. If you already have a mining rig for mining Ethereum (the most mined altcoin), you can just point your miners to Minergate. It works in the following way:
Ethminer: ethminer -C -F http://eth.pool.minergate.com:55751/YOUR_EMAIL –disable-submit-hashrate (GetWork)
Genoil OpenCL: ethminer -G -S eth.pool.minergate.com:45791 -O YOUR_EMAIL (Stratum)
Genoil CUDA: ethminer -U -S eth.pool.minergate.com:45791 -O YOUR_EMAIL (Stratum)
Step 4. Withdraw to XEM
After you have mined some coins, you can convert them on the pool’s exchange, or you can move them to one to convert them, and then send the XEM to your NEM wallet.
How to Mine NEM – Summary
NEM has a very unique block generating system that is not compatible with the usual POW mining style, we are used to seeing, but there is a way of mining NEM and getting some XEM. An easier way of getting XEM is by directly buying or trading them. We hope that this article helped you, and now you know how to mine NEM (XEM).


