How to Use Uniswap for Swapping, Sending, and Buying Crypto (UPDATED 2025)
If you’re looking to trade cryptocurrencies without relying on a centralized exchange, Uniswap is one of the best options available. As the largest decentralized exchange (DEX) on the Ethereum blockchain, Uniswap allows users to swap, send, buy crypto, and even trade NFTs – all without intermediaries.
This guide provides a step-by-step walkthrough on how to use Uniswap, making it easier for beginners and experienced traders alike to navigate the platform.
[nativeAds]
What is Uniswap?
Uniswap is a decentralized finance (DeFi) protocol that launched in November 2018. Unlike traditional exchanges such as Binance or Coinbase, Uniswap operates without a central authority, enabling users to trade directly with each other through smart contracts.
Uniswap uses an Automated Market Maker (AMM) model, where users supply liquidity to pools, and an algorithm determines the price based on supply and demand. This system ensures efficient trading and eliminates the need for an order book.
Key Features of Uniswap:
- Decentralized & Trustless: No need for third-party oversight.
- Automated Market Maker (AMM): Liquidity pools set prices based on supply/demand.
- Supports ERC-20 Tokens: Trade a vast range of tokens.
- Uniswap Governance Token (UNI): Holders can vote on platform decisions.
How Uniswap Works
Uniswap operates using a Constant Product Market Maker formula:
Where:
- x = Amount of Token A in the liquidity pool.
- y = Amount of Token B in the liquidity pool.
- k = Constant total liquidity.
When a user swaps tokens, the ratio of assets in the liquidity pool changes, automatically adjusting prices based on the formula. This ensures fair and balanced trading without the need for centralized control.
How to Use Uniswap (Step-by-Step Guide)
Now that you have a basic understanding of Uniswap and how it works, let’s explore what you need to know as a beginner to start using it for different activities.
First, we’ll walk you through the essential step of connecting your wallet to the Uniswap app—this is key because every action you’ll take, from swapping tokens to trading NFTs, depends on having your wallet linked.
Once you’re set, we’ll guide you through how to swap, send, and buy tokens, as well as how to trade NFTs, making it easy for you to navigate all the features Uniswap has to offer.
How to Connect Your Crypto Wallet to Uniswap: Step-by-Step Guide
Right now, you can connect a crypto wallet to the Uniswap Protocol using one of these options: the official Uniswap Wallet (available for iOS, Android, and Chrome), MetaMask, Brave Wallet, WalletConnect, or Coinbase Wallet.
To make things easier to follow, we’ll walk you through the steps using MetaMask, but the process is pretty much the same for any of the other wallets.
Step 1. Access the Uniswap Official Website to Launch the App and Press the “Connect” Button
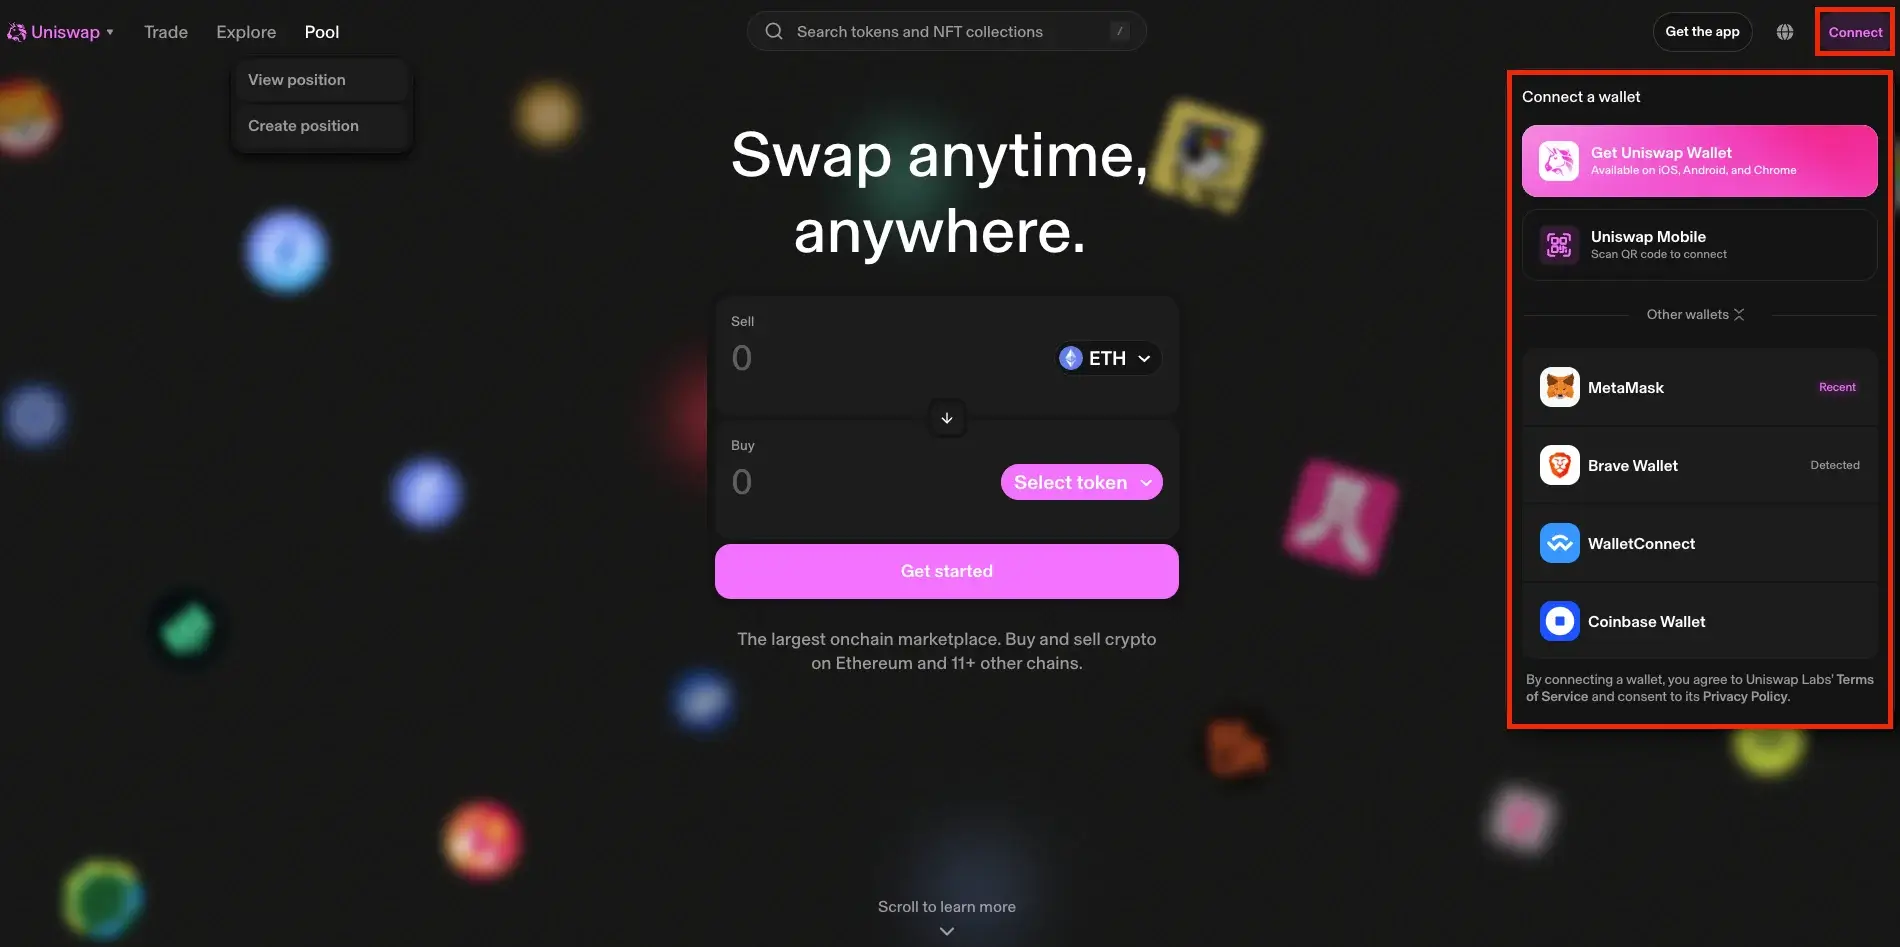
Start by visiting the official Uniswap website. Once you’re there, you’ll see a “Launch App” button in the top right corner. Click it to get started.
After the app opens, look for the “Connect” button in the top right corner. Click it and choose the wallet you’d like to use (we’ll use MetaMask as an example).
Step 2. Link Your MetaMask Wallet
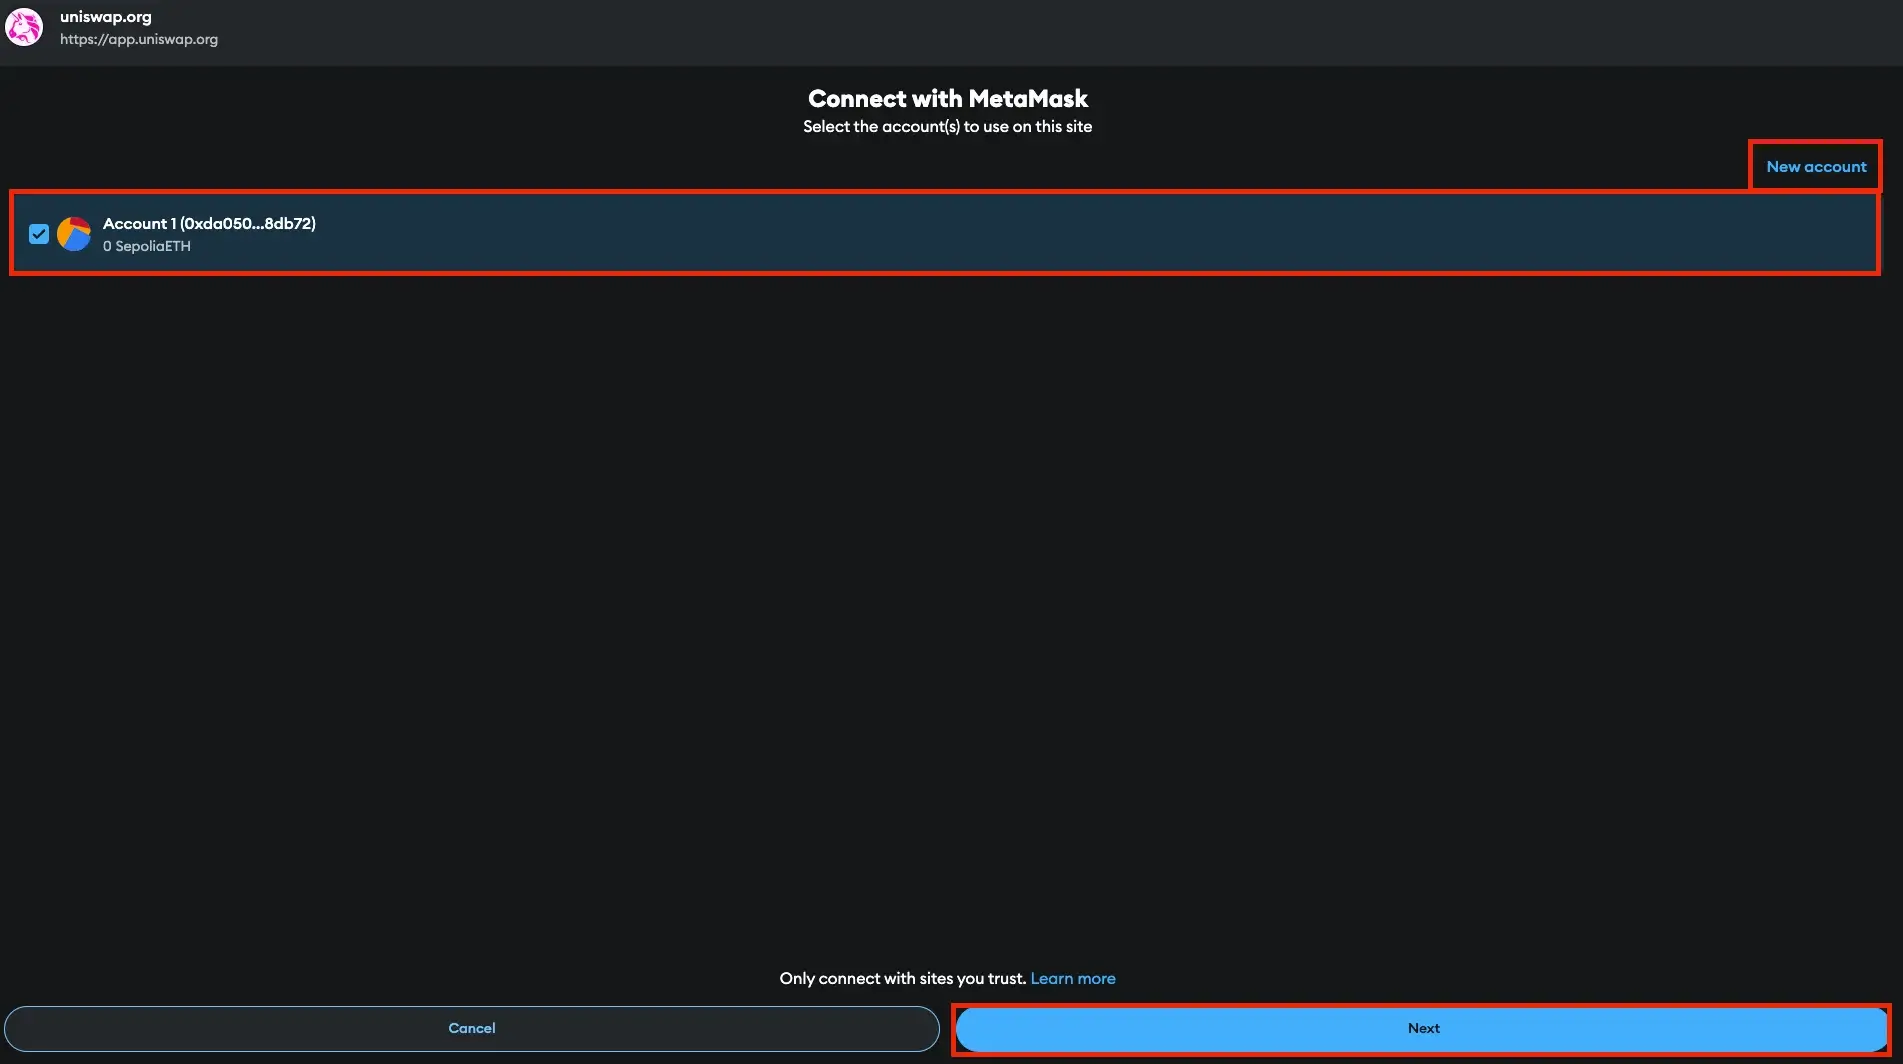
Once you click “Connect,” a new window will pop up. Here, you can select which MetaMask account you want to link to Uniswap. If you don’t have one yet or prefer a new one, simply click “New Account” to create it.
After selecting your account, hit “Next,” then click “Confirm” to grant Uniswap the necessary permissions.
And just like that, your MetaMask wallet is connected to Uniswap!
How to Use Uniswap to Swap Tokens: Step-by-Step Guide
Swapping tokens on Uniswap allows you to exchange one cryptocurrency for another directly on the platform without the need for intermediaries. This decentralized process makes it simple and secure to trade a wide range of tokens.
Below, we’ll walk you through the steps to successfully swap tokens on Uniswap.
Step 1. Go to the “Swap” Section and Enter Your Transaction Details
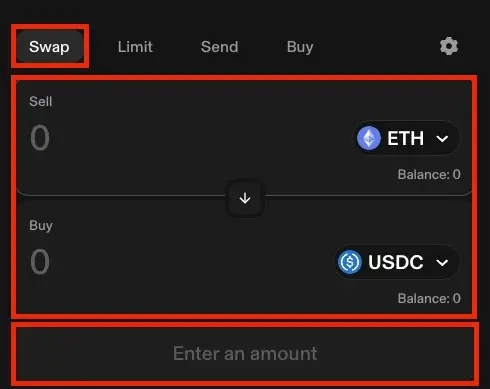
After connecting your wallet to Uniswap, navigate to the main page and click on the “Swap” section to start swapping your crypto.
From the drop-down menu, choose the cryptocurrency you want to sell from your portfolio, enter the amount, and then select the cryptocurrency you want to receive in exchange.
After entering all the details, click “Swap.”
Step 2. Review and Confirm the Swap
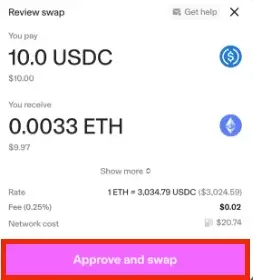
Take a moment to review all the transaction details. If everything looks good, click the “Approve and swap” button.
In your wallet, you’ll need to approve the token you’re swapping, which will require a network fee. If it’s your first time swapping that token on Uniswap, you’ll also need to authorize the token for trading.
Once that’s done, sign the message in your wallet (this part doesn’t require any network fee). Finally, confirm the swap in your wallet, which will again require a network fee.
Once confirmed, your swap will be submitted to the blockchain, and you’ll see a “Swap success” message with a green checkmark once the transaction is complete.
How to Use Uniswap to Send Crypto Assets: Step-by-Step Guide
Sending crypto assets on Uniswap is a straightforward way to transfer tokens from one wallet to another. Whether you’re paying someone or transferring assets between your own wallets, Uniswap makes it easy.
Step 1. Go to the “Send” Section and Enter Your Transaction Details
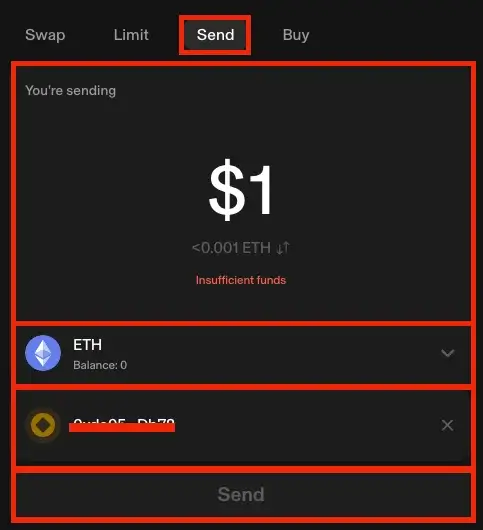
Once your wallet is connected to Uniswap, head to the main page and click on the “Send” section to transfer your crypto.
Enter the amount you want to send, choose the cryptocurrency from the drop-down menu, and in the “To” field, add the wallet address or ENS name of the recipient.
Once all the details are filled in, click the “Send” button.
Step 2. Review and Confirm the Transaction
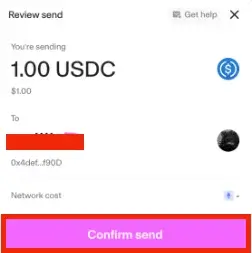
If this is the first time your wallet is sending tokens to the entered address, a message may pop up. Review it carefully and click “Continue.” After that, confirm the transaction by selecting “Confirm send.”
Once the transaction is submitted, you’ll see a pending icon in the top right corner. A notification will let you know when the transaction is completed. You can click on the notification to view the transaction on the blockchain explorer.
How to Use Uniswap to Buy Crypto: Step-by-Step Guide
Uniswap users can buy a wide range of ERC-20 tokens on the Uniswap platform. Below is how you can do that.
Step 1. Go to the “Buy” Section and Enter the Details About the Transaction
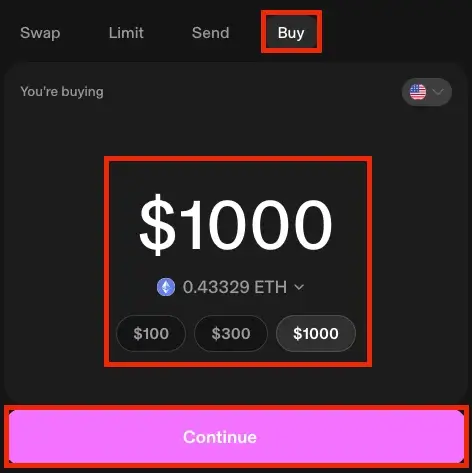
After connecting your wallet to Uniswap, head to the main page and click on the “Buy” section to start purchasing crypto.
Here, you’ll need to select your region, insert the amount you want to buy, and pick the cryptocurrency you want. Once you’ve entered the details, click “Continue.”
Step 2. Choose a Provider and Complete the Transaction
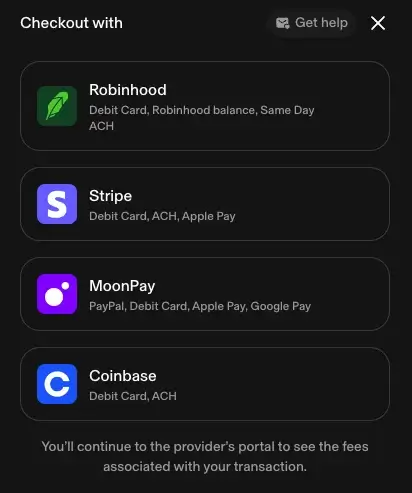
Now, you’ll see a list of providers you can use to buy crypto. The options will depend on your region and could include providers like Robinhood, Coinbase, MoonPay, or Stripe.
Select your preferred provider, and you’ll be redirected to their site to complete the purchase.
If you’re using the provider for the first time, you might need to verify your email, phone number, or even your identity, depending on your location.
Once you’ve completed these steps, your crypto will be deposited directly into your wallet.
How to Use Uniswap for NFT Trading: Step-by-Step Guide
Uniswap provides an easy way to purchase NFTs directly through their platform. We’ll walk you through the steps below.
Additionally, you can also buy from popular NFT marketplaces like OpenSea via Uniswap using a similar process.
Step 1. Go to the NFT Trading Page on Uniswap
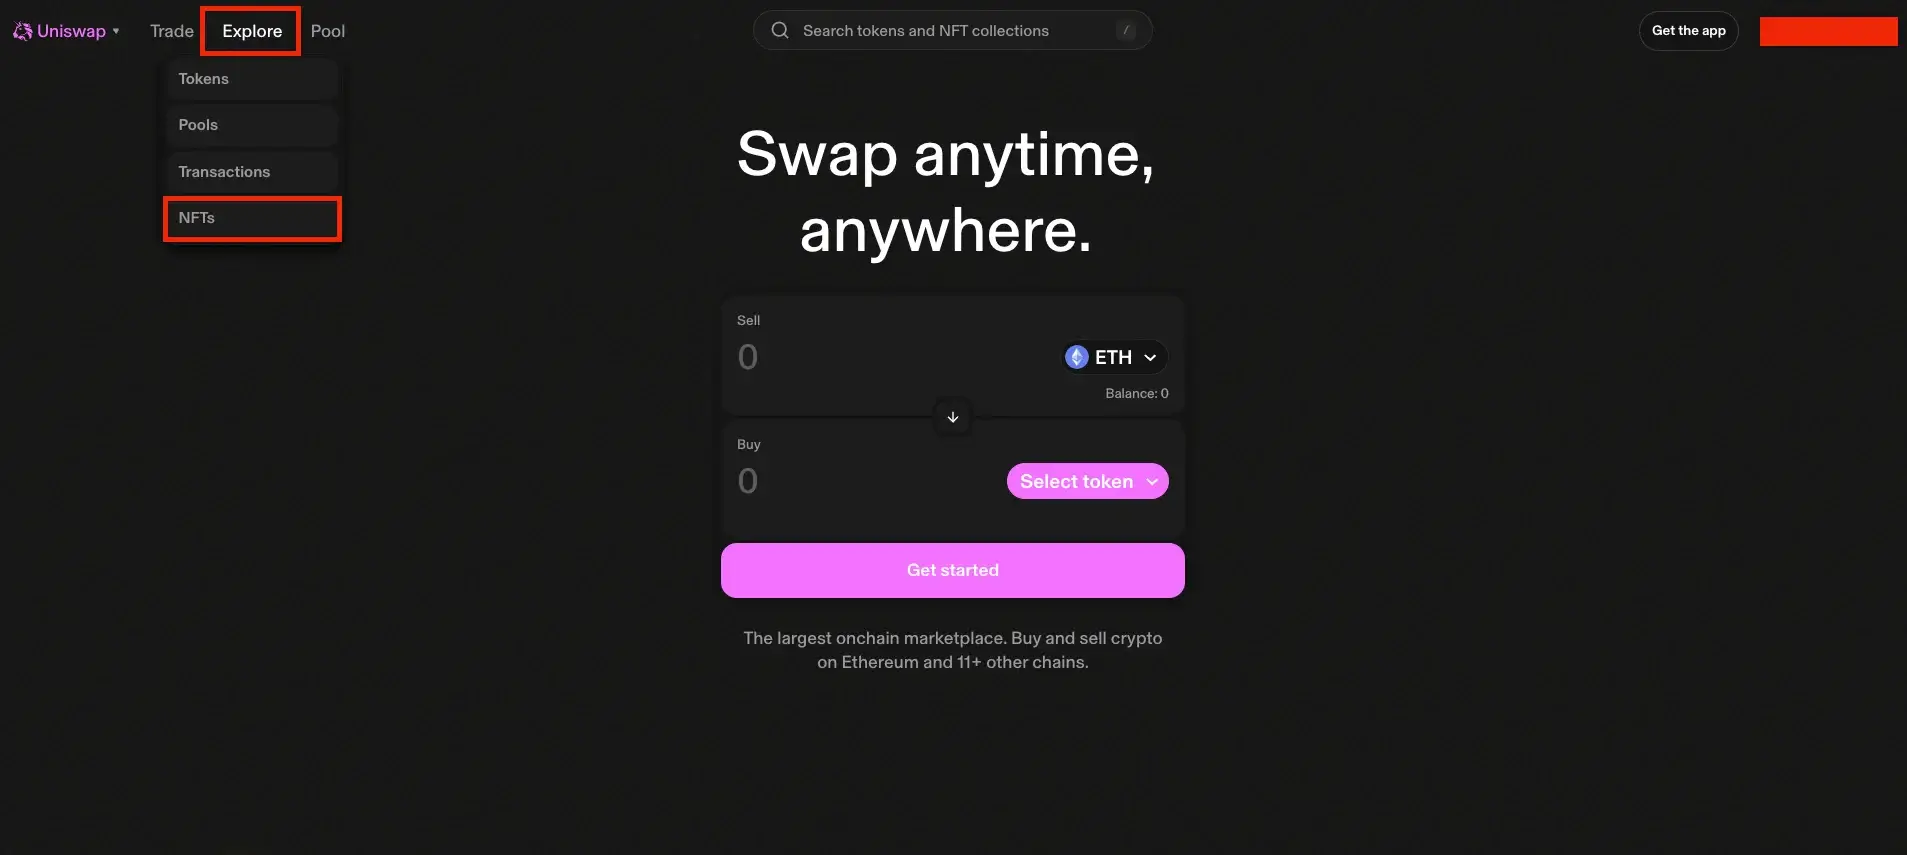
To facilitate trading with NFTs on the Uniswap platform, you’ll need to access the special section designed for this purpose. From the header bar, click on “Explore” and then select “NFTs.” This will take you to Uniswap’s NFT trading page.
Step 2. Search for Your Desired NFT
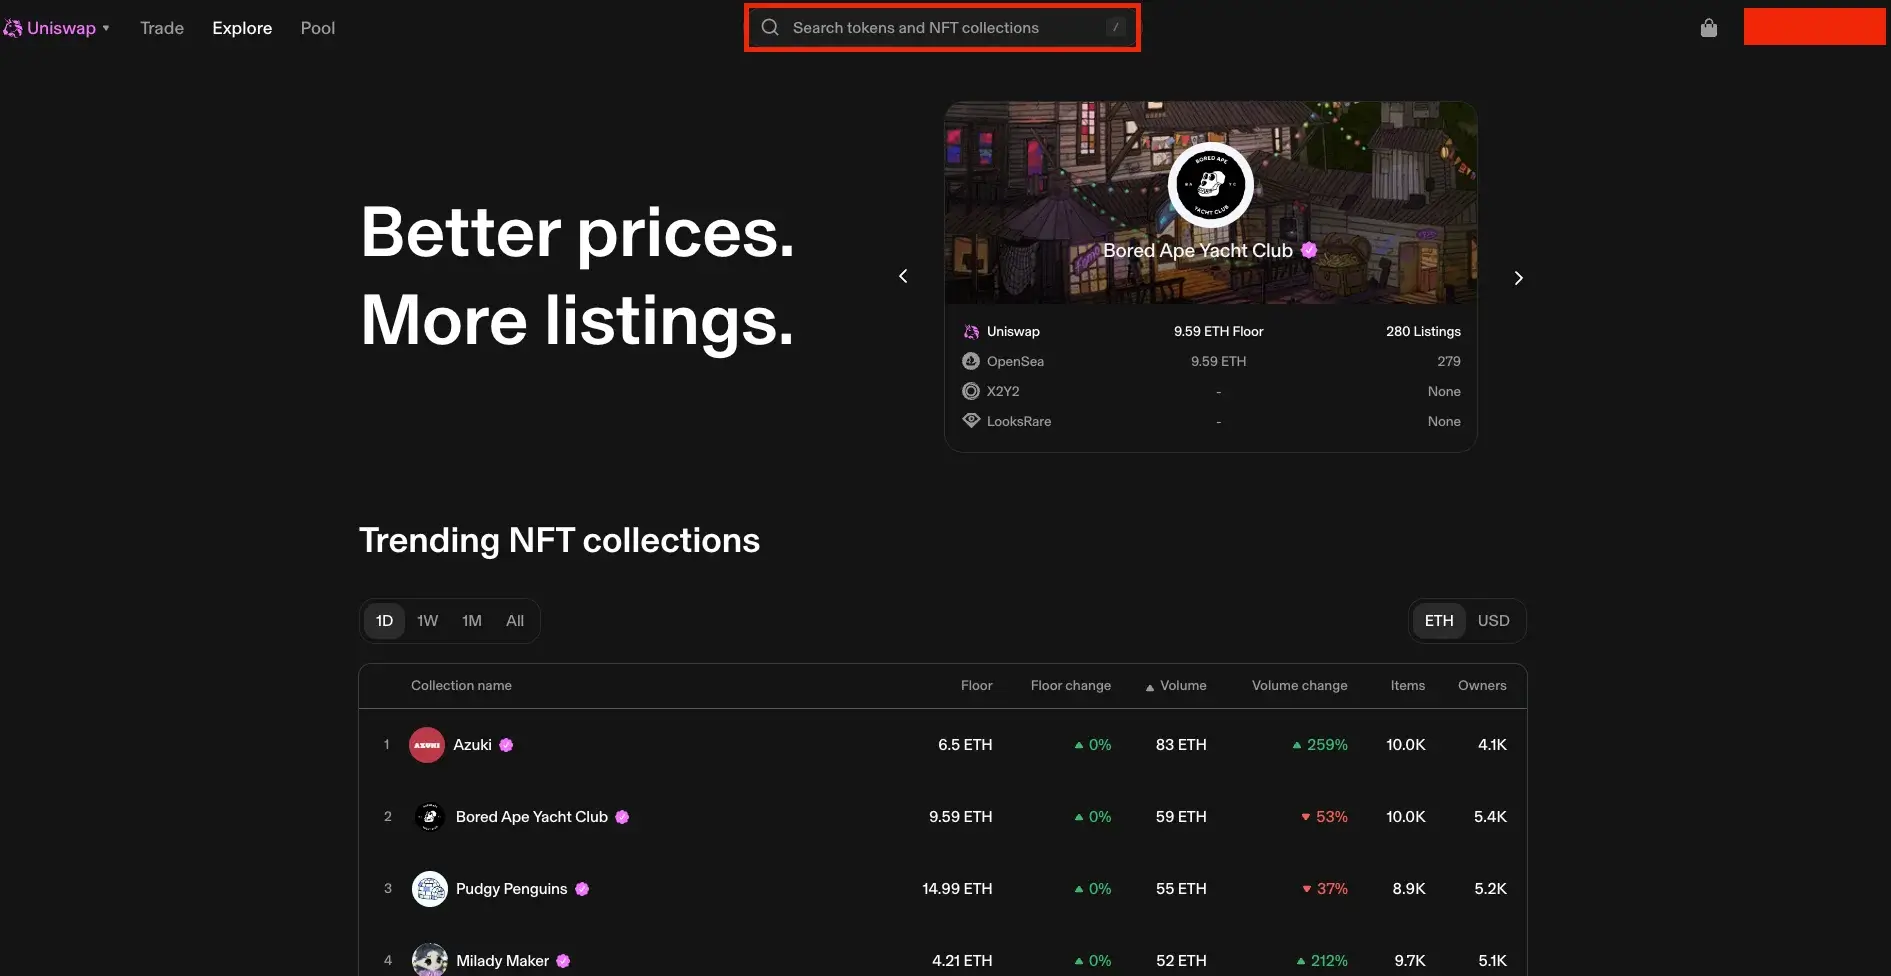
At the top of the NFT trading page, you’ll see a search bar. Use it to find the specific NFT you want to buy.
You can also explore popular NFT collections displayed just below the search bar.
Step 3. Add the NFT to Your Bag and Complete the Purchase
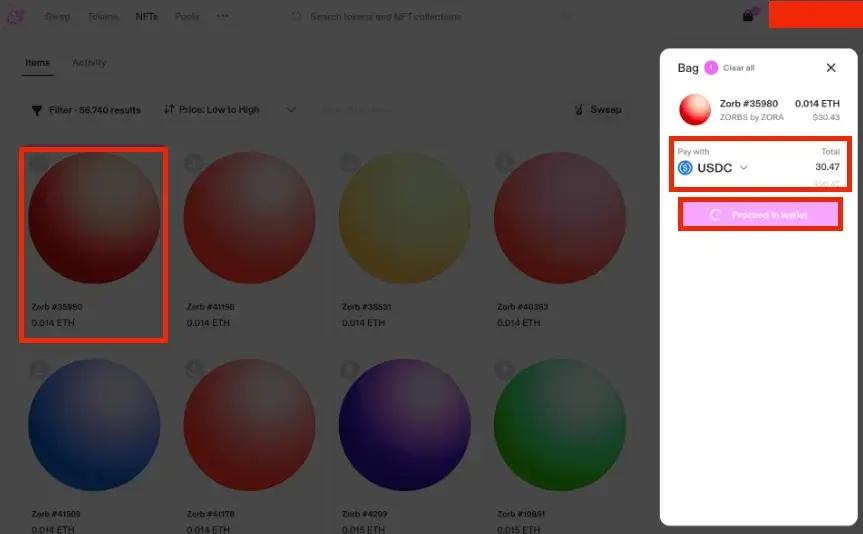
Once you find the NFT you want, hover over it and click the “Add to bag” button.
After adding it to your bag, choose the cryptocurrency you want to use for payment and click “Pay.” Make sure the amount of tokens in your wallet covers the total price of the NFT, and you’re all set!
How to Use Uniswap Protocol as a Liquidity Provider: Step-by-Step Guide
As an automated liquidity protocol, Uniswap also allows you to use its platform to provide liquidity. Below is how.
Step 1. Access the Uniswap App and Select “New Position”
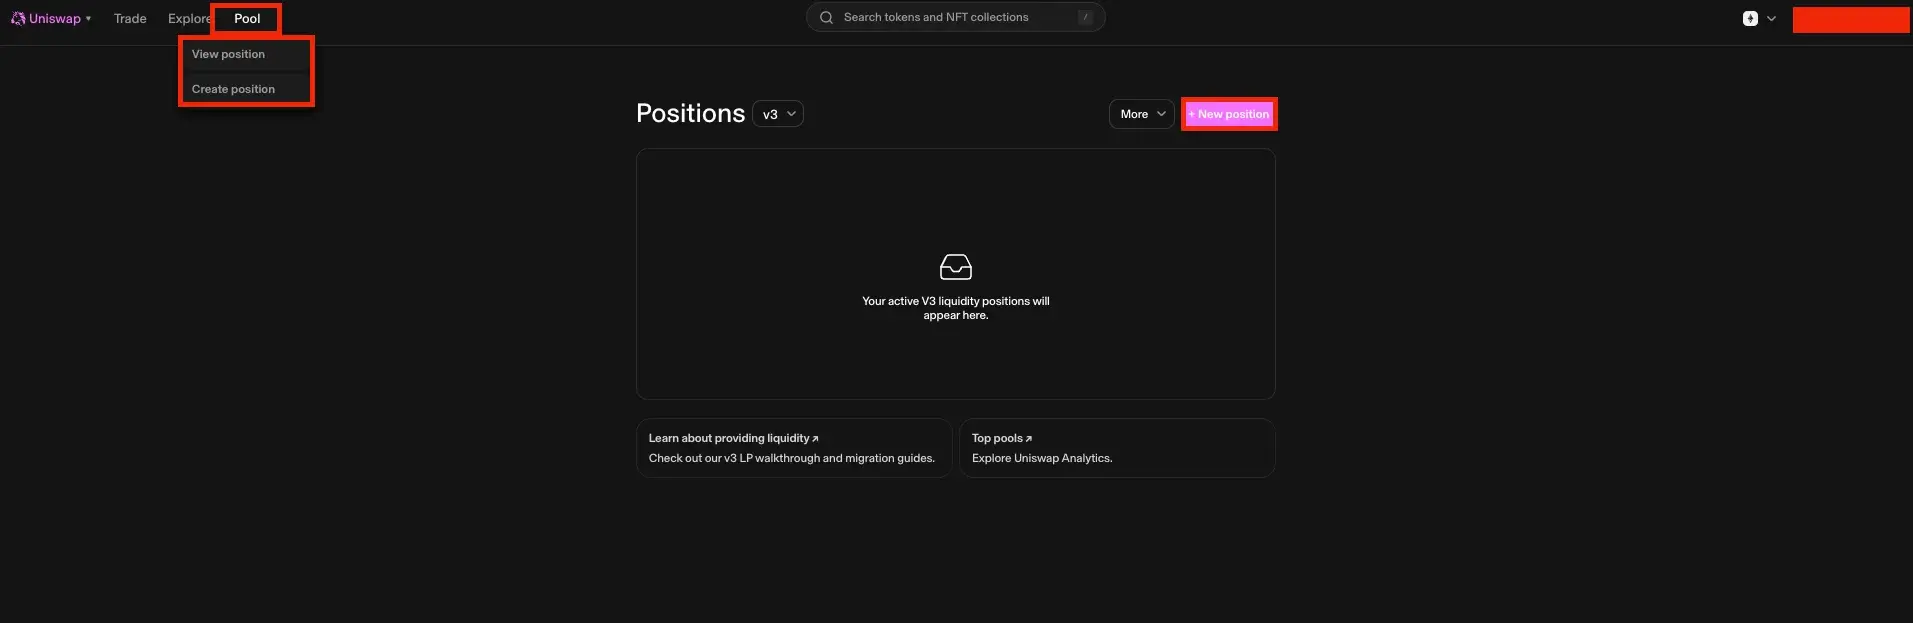
To begin adding liquidity on Uniswap V3, open the Uniswap web app and navigate to the “Pools” section. This is where you can create or manage liquidity pools.
From here, click on the “New Position” option to start. You’ll need to select the tokens for which you want to add liquidity by choosing them from the drop-down menus.
Uniswap allows any pair of ERC-20 tokens, so you have plenty of options.
Step 2. Select Fee Tier and Price Range
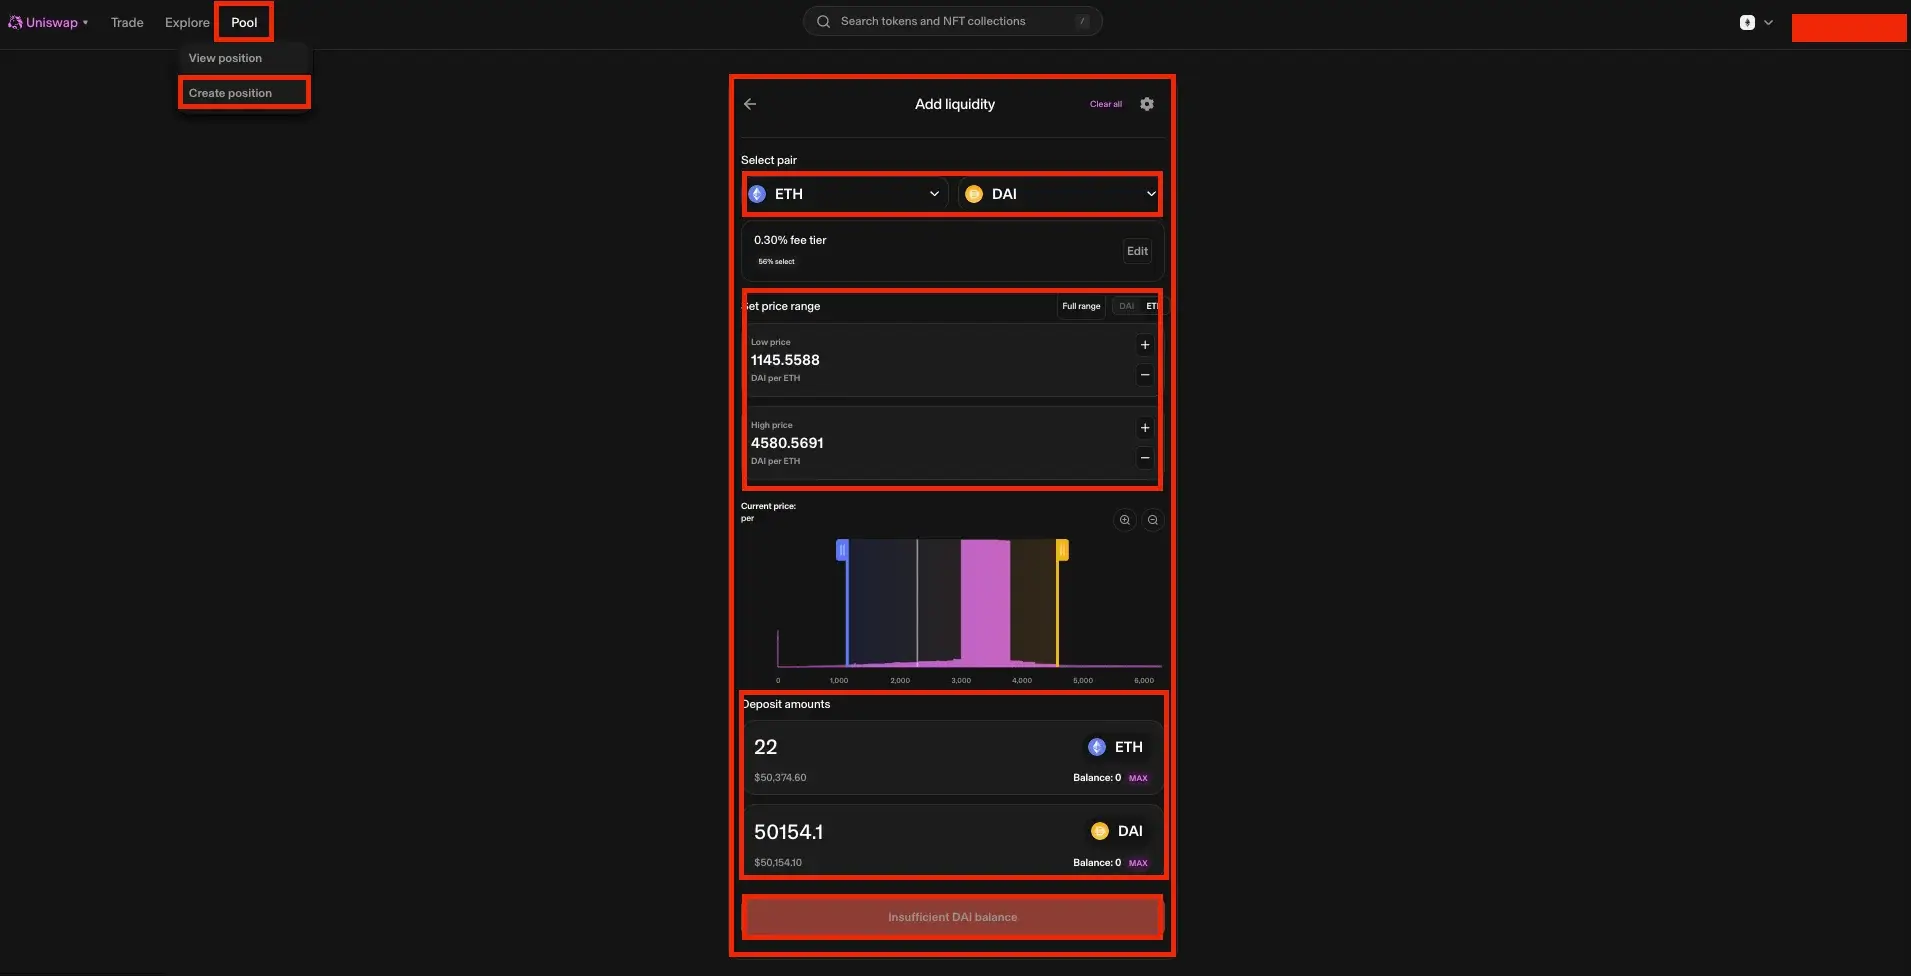
After choosing your token pair, select a fee tier. Uniswap offers four options: 0.01%, 0.05%, 0.3%, and 1%. The fee tier affects how much you’ll earn in trading fees. If a pool already exists for your selected fee tier, your liquidity position will join it; if not, you’ll create a new pool.
Next, set the price range where your liquidity will be active. If the price moves outside your set range, your liquidity will be concentrated into one of the assets and stop earning fees. You can set a specific range or provide liquidity across the full price range.
Step 3. Add Tokens and Confirm Transaction
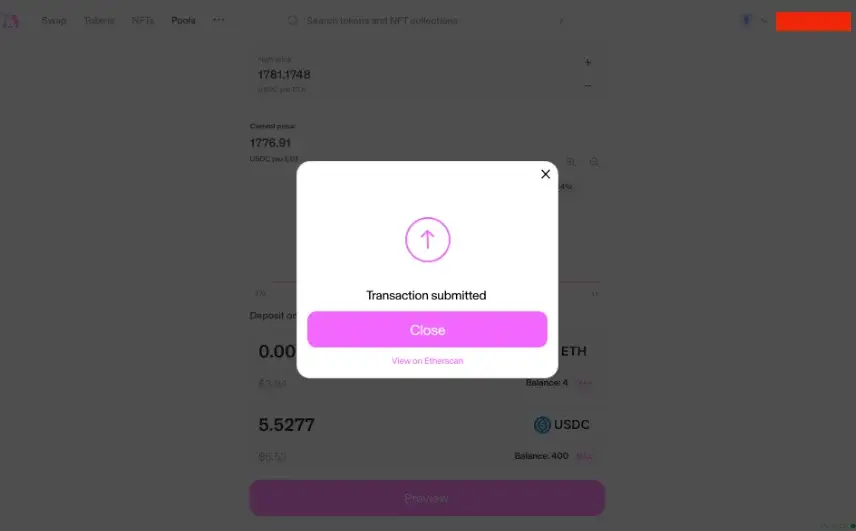
Enter the amount of tokens you wish to add to the pool or select “Max” to deposit the maximum amount.
Once done, click “Approve” and grant Uniswap permission in your wallet to use these tokens, which will involve network fees. After approval, select “Preview” to review the details and then “Add” to confirm the transaction. This will require a final confirmation in your wallet, and the transaction will incur another network cost.
Once completed, you’ll receive a confirmation and can track the status on Etherscan. Your liquidity position will then be live and manageable from the V3 Pool page.
Uniswap’s Role in the DeFi Ecosystem
Uniswap is far more than just a platform for token swaps – it serves as one of the core building blocks of the decentralized finance (DeFi) ecosystem. Its liquidity pools power countless other DeFi projects, from lending protocols and staking platforms to yield aggregators and synthetic asset systems. When users provide liquidity on Uniswap, those same pools are often tapped by external protocols to enable lending markets, automated vaults, and other DeFi services that depend on reliable and deep liquidity.
This makes Uniswap not just a trading venue but a critical layer of infrastructure supporting the entire Ethereum economy. Many decentralized apps (dApps) integrate Uniswap directly through APIs or smart contracts to execute trades or source price data. As a result, the protocol’s influence extends beyond swaps – it underpins liquidity for hundreds of on-chain projects, reinforcing its position as one of the most important innovations in DeFi since its launch.
Security and Safe Usage on Uniswap
Despite its strong reputation, users must remain cautious when trading on decentralized exchanges like Uniswap. Because anyone can list a token on the platform, it’s essential to verify the legitimacy of token contracts before making any swaps. Scammers often create fake tokens that mimic popular projects, so always check the official website or project documentation for the correct contract address. Additionally, users should ensure they are visiting the official Uniswap domain (app.uniswap.org) to avoid phishing websites designed to steal wallet information.
Security-conscious traders also monitor gas fees and confirm transaction details carefully before finalizing a swap. Remember that blockchain transactions are irreversible – once confirmed, they cannot be undone. Using a reputable wallet, enabling hardware wallet confirmation when possible, and keeping private keys offline are all crucial steps to protect funds. As a non-custodial platform, Uniswap never holds user assets, which provides transparency and control – but it also means that personal security practices are entirely in the user’s hands.
FAQs
1. Do I Need ETH to Use Uniswap?
Yes, ETH is required to pay gas fees on the Ethereum blockchain. However, you can trade ERC-20 tokens without holding ETH if you have enough balance for gas fees.
2. What are Uniswap Fees?
Uniswap charges swap fees based on the selected liquidity pool tier:
- 0.01% (Stable pairs like USDT/DAI)
- 0.05% (Blue-chip pairs like ETH/USDC)
- 0.3% (Most common pools)
- 1% (High-risk or exotic pairs)
3. What Makes Uniswap Different from Centralized Exchanges?
- No KYC is required – Trade without identity verification.
- Non-Custodial – Users retain control over funds.
- Transparent & Open-Source – Anyone can inspect the code.
4. What Are the Best Uniswap Alternatives?
If you want to explore other DEXs, consider:
- PancakeSwap (BSC)
- SushiSwap (Ethereum, multi-chain)
- 1inch Network (DEX aggregator)
- Curve Finance (Stablecoin swaps)
Conclusion
Uniswap remains the leading decentralized exchange, offering a simple yet powerful platform for swapping, sending, and buying crypto. Following this guide, you can confidently use Uniswap for all your DeFi needs.
With no centralized control, full transparency, and a user-friendly interface, Uniswap empowers users to trade freely. Whether you’re a beginner or a seasoned DeFi trader, mastering Uniswap is a key step in navigating the world of decentralized finance (DeFi).