How to Use BSC to ETH Bridge Securely: Step-by-Step Guide (UPDATED 2026)
Key Takeaways
- Bridging BSC to ETH lets you access Ethereum’s DeFi ecosystem without selling or repurchasing assets on a centralized exchange.
- In 2026, using a bridge aggregator like Jumper Exchange or LI.FI is the smartest approach – they scan multiple bridges at once and consistently find cheaper routes than going direct.
- Always test with a small amount first – blockchain transactions are irreversible, and mistakes can result in permanent loss of funds.
- Stick to native asset bridges like Stargate or Across Protocol where possible – wrapped token bridges carry extra risk if the platform is exploited.
- Never use a bridge purchased from an unofficial source or access platforms through unverified links – phishing sites are one of the most common attack vectors.
Interoperability is key in the world of blockchain technology. As the blockchain ecosystem expands, seamless cross-chain transactions and asset transfers are becoming increasingly important. One of the essential tools enabling this is a blockchain bridge, a gateway for migrating assets between different networks, such as Binance Smart Chain (BSC) and Ethereum (ETH).
However, ensuring security and efficiency when transferring assets across blockchains is crucial to safeguarding your digital holdings. This guide will provide a step-by-step walkthrough to help you securely transfer assets between BSC and Ethereum, while understanding its technical aspects, benefits, risks, and best practices.
In 2026, blockchain interoperability has matured significantly. Intent-based bridging has become the dominant model, meaning users can simply specify what they want on the destination chain and protocols handle the routing automatically. The Stargate protocol – one of the most widely used bridges for BSC and ETH transfers – was acquired by LayerZero in late 2025, consolidating two of the biggest names in cross-chain infrastructure into a single ecosystem. Bridge aggregators like LI.FI and Jumper Exchange now connect 60+ chains from a single interface, making manual bridge comparisons largely unnecessary for most users.
Table of contents
Step-by-Step Guide: How to Bridge Between BSC and ETH Securely
Method 1: Using Decentralized Asset Bridge Apps (cBridge or ChainPort)
One of the most popular and convenient methods to bridge Binance Smart Chain (BSC) with Ethereum (ETH) is using decentralized asset bridge apps offered by companies like cBridge or ChainPort. Our analysis shows these options appear to be the most suitable for bridging the Binance Chain to the Ethereum Mainnet network.
Now, let’s walk through the process step by step. We’ll demonstrate using cBridge as an example, but please note that the procedure is similar for ChainPort.
Before we begin, it’s crucial to emphasize that transferring assets from the Binance Smart Chain to another blockchain requires preciseness. If done incorrectly, there’s a risk of losing your assets permanently. Therefore, exercise extreme caution and carefully follow the steps below:
Step 1. Switch Blockchain by Changing Your Wallet Settings to the Binance Smart Chain (BNB Smart Chain)

To prepare to transfer or bridge assets from Binance Smart Chain (BSC) to Ethereum, you should first ensure that your wallet’s default network is set to Binance Smart Chain. This network switch is essential to enable the transaction. Here’s how to make the change if you’re using MetaMask:
Start by opening the MetaMask extension and unlocking your wallet. Once you’ve done that, locate the network selector box within the main MetaMask window. It’s a dropdown menu that allows you to choose your network. From the available networks in your wallet, select “BNB Chain.”
However, if you don’t find “Binance Smart Chain” in the list of available networks, don’t worry. You can manually add it to MetaMask by clicking on the “Add network” button. Then, specify “Binance Smart Chain” as your desired network. This adjustment ensures that your wallet is properly configured for the subsequent steps in the bridging process.
Step 2. Go to the Bridge Website and Connect Your Wallet to It
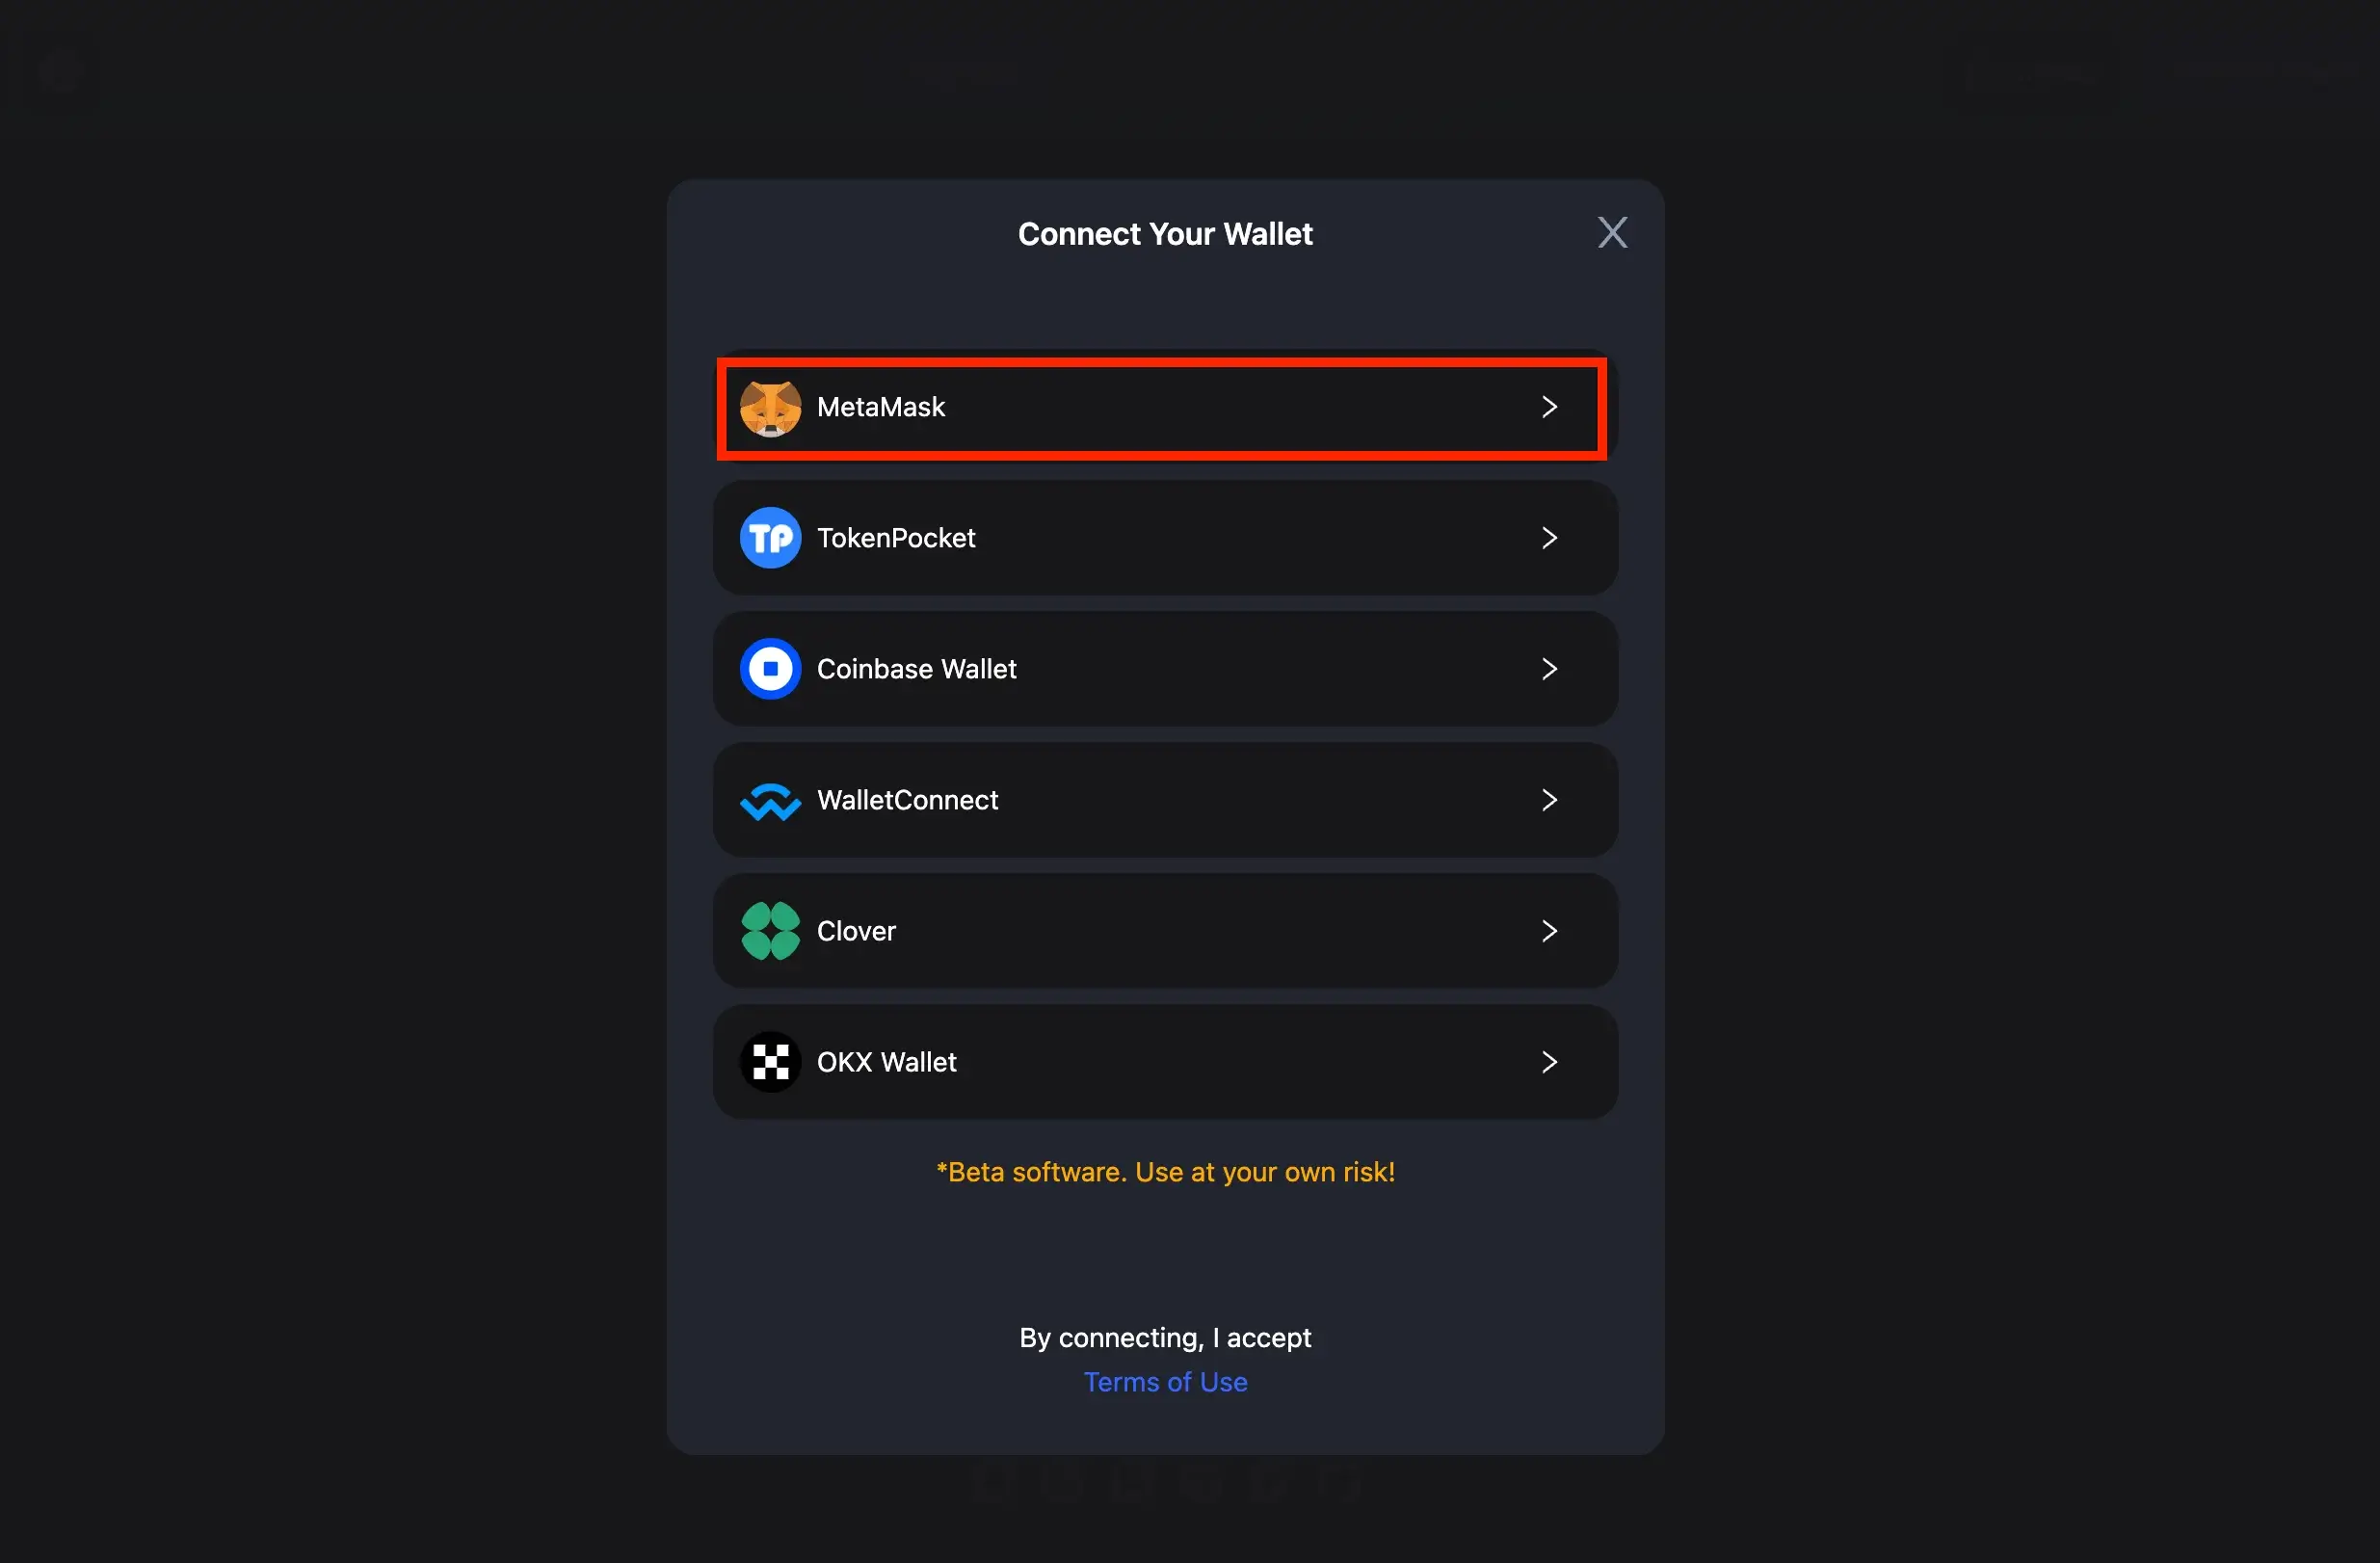
Once you’ve switched your MetaMask wallet to the Binance Smart Chain network, you can connect it to the cBridge website with these straightforward steps. Open your web browser and visit the cBridge website (or ChainPort, depending on your choice).
Look for the “Connect Wallet” option in the website’s upper right corner and simply click it. A dialog box will then appear, presenting you with compatible wallets. In this list, choose “MetaMask.”
If, however, you are using a different cryptocurrency wallet, identify your wallet in the list of wallets compatible with the Celer Bridge platform and then proceed to approve the connection similarly.
Step 3. Choose the Origin and Destination Blockchains
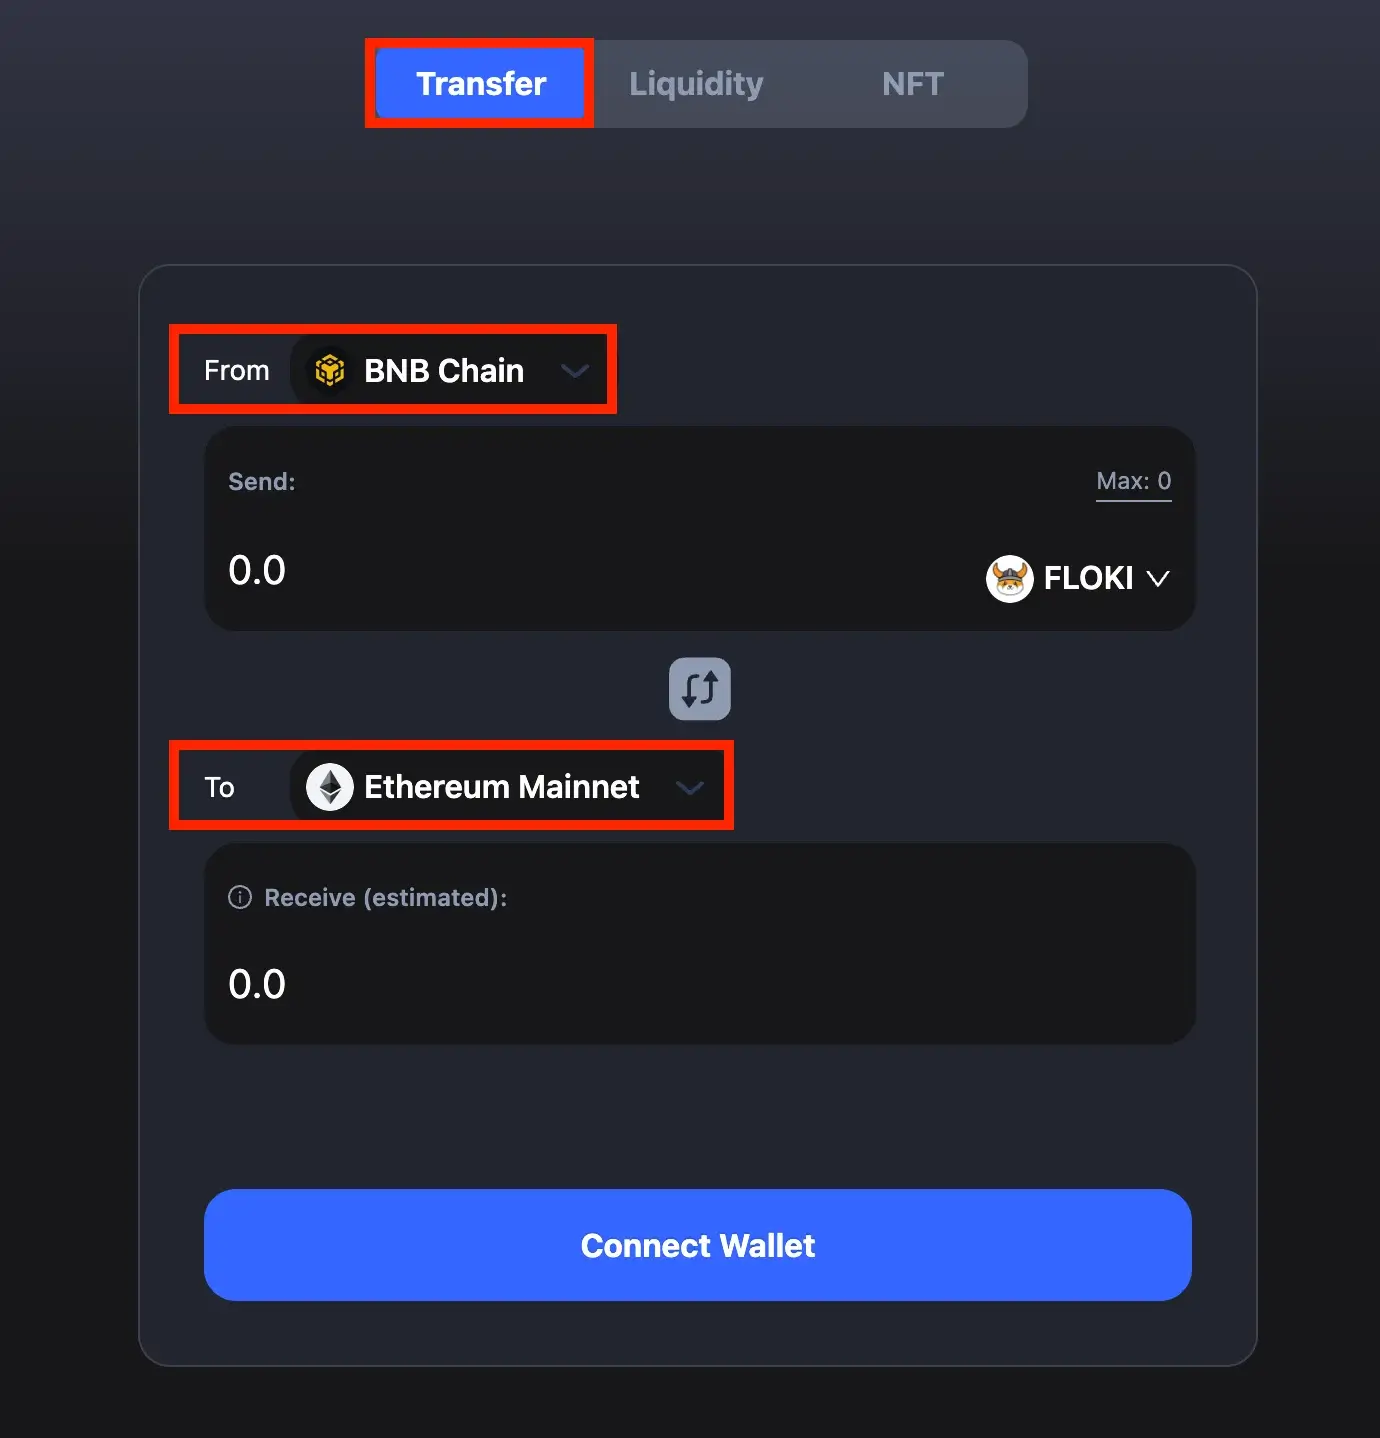
In the “From” section, choose “BNB Chain” as your origin chain, and in the “To” section, opt for “Ethereum Mainnet” as your destination chain.
Step 4. Pick the Token You Want to Move, Specify How Much, and Click the “Transfer” Button
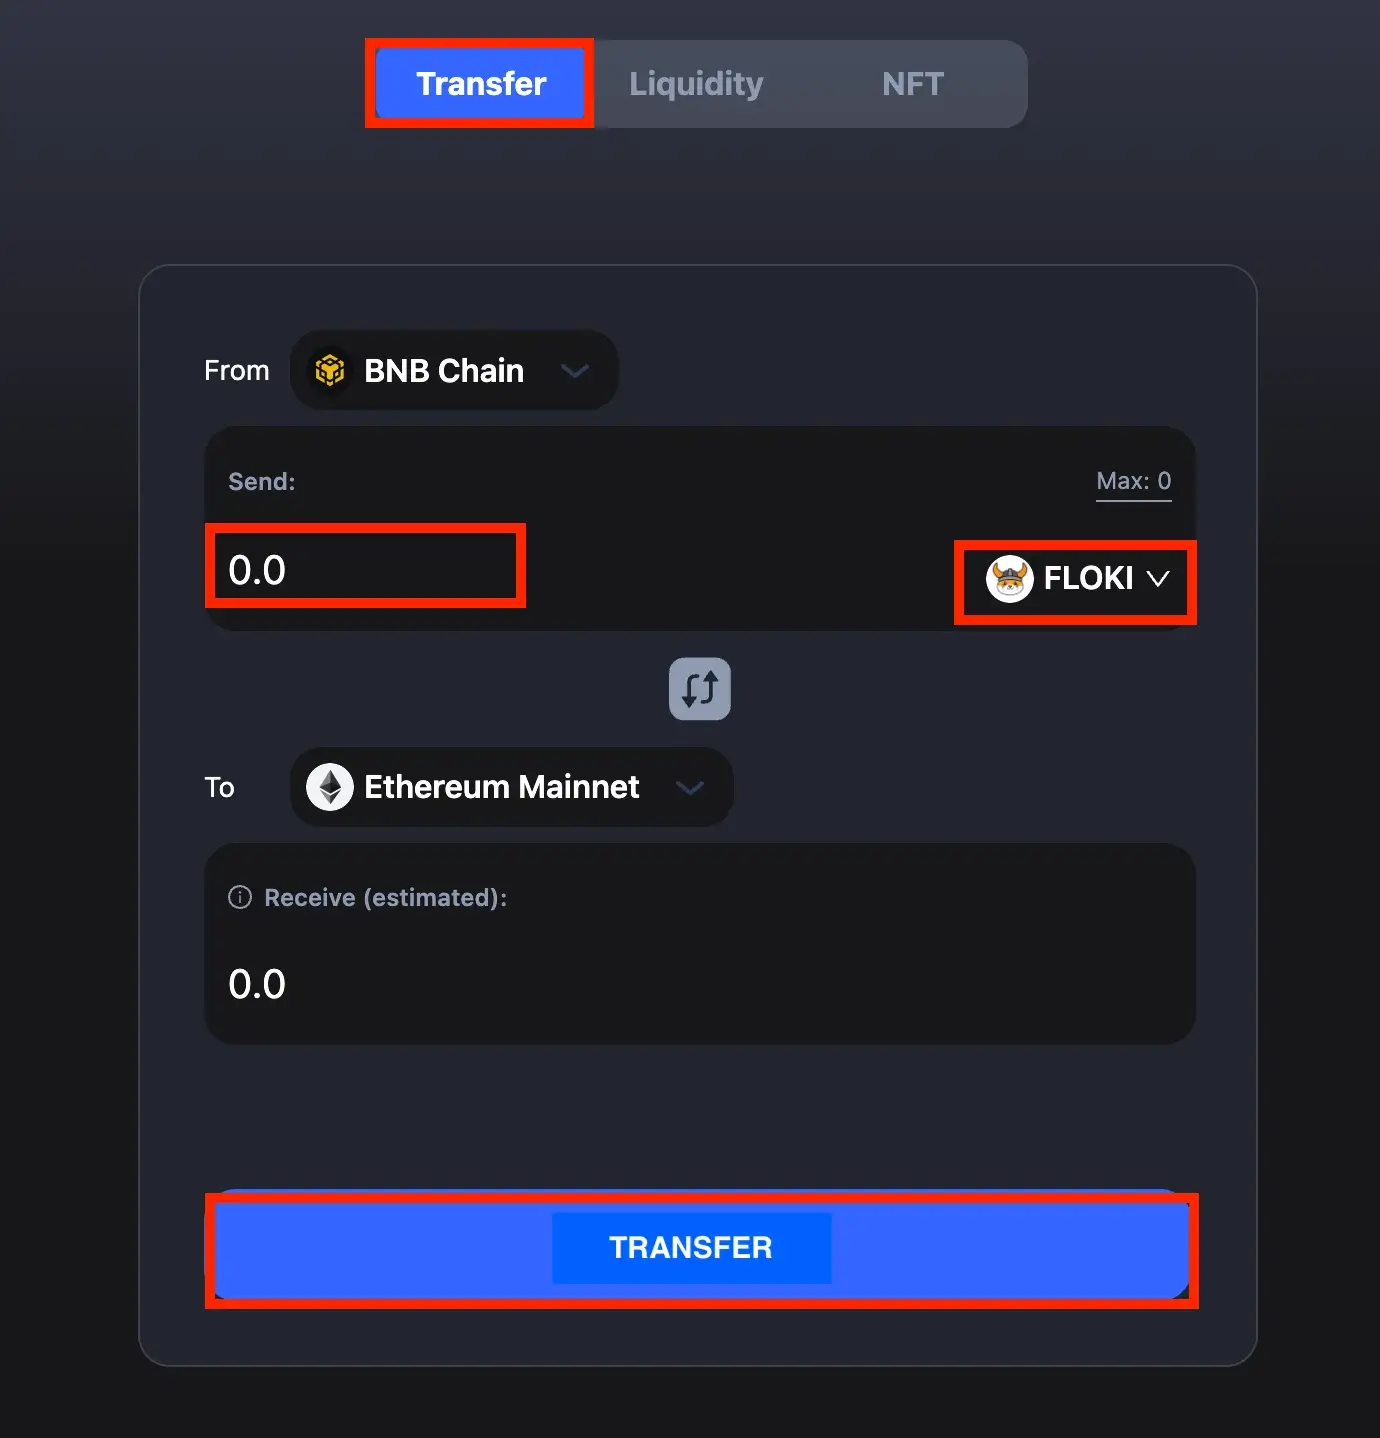
Select the token you wish to transfer (in our exemplification, we used FLOKI), specify the quantity of that chosen token for the transfer, and initiate the bridging process by clicking the “Transfer” button.
Step 5. Confirm Your Transaction
Now, you should encounter a pop-up requesting your approval for token spending. First, on the cBridge dialog, click the “Approve” button. After that, a similar dialog will appear in MetaMask; here, click “Confirm” to grant cBridge the authorization to spend tokens from your wallet.
Once you’ve approved the token spending on MetaMask, cBridge will prompt you to confirm the transaction. Carefully review the transaction details and, on the cBridge interface, click “Confirm Transfer.”
Review the transaction details in the pop-up MetaMask window, including the amount and associated transaction fees. Click “Confirm” to give your wallet the green light to complete the transaction.
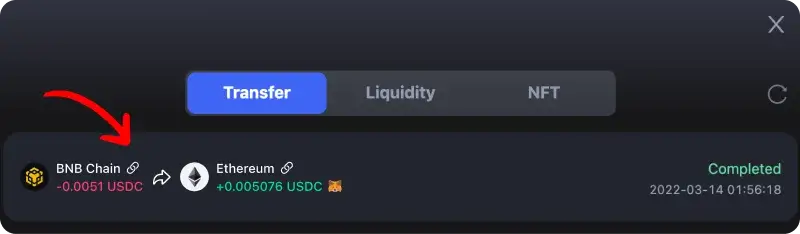
After your wallet approves the transaction, return to cBridge and patiently wait for the transaction to finalize. Once it’s complete, launch MetaMask and switch your network back to Ethereum Mainnet. This step will allow you to check if the funds you bridged are now successfully available in your wallet.
Method 2: Bridging via Coinbase Wallet
Coinbase Wallet now allows its users to seamlessly bridge cryptocurrency directly from their browser extension or mobile app. To make this process easy, follow these simple steps:
Step 1. Access the Bridge Icon
When you’re logged into your wallet, look for the “Bridge” button at the top-center of your wallet homepage. Click on it to begin the process.
Step 2. Choose Your Networks and Amount
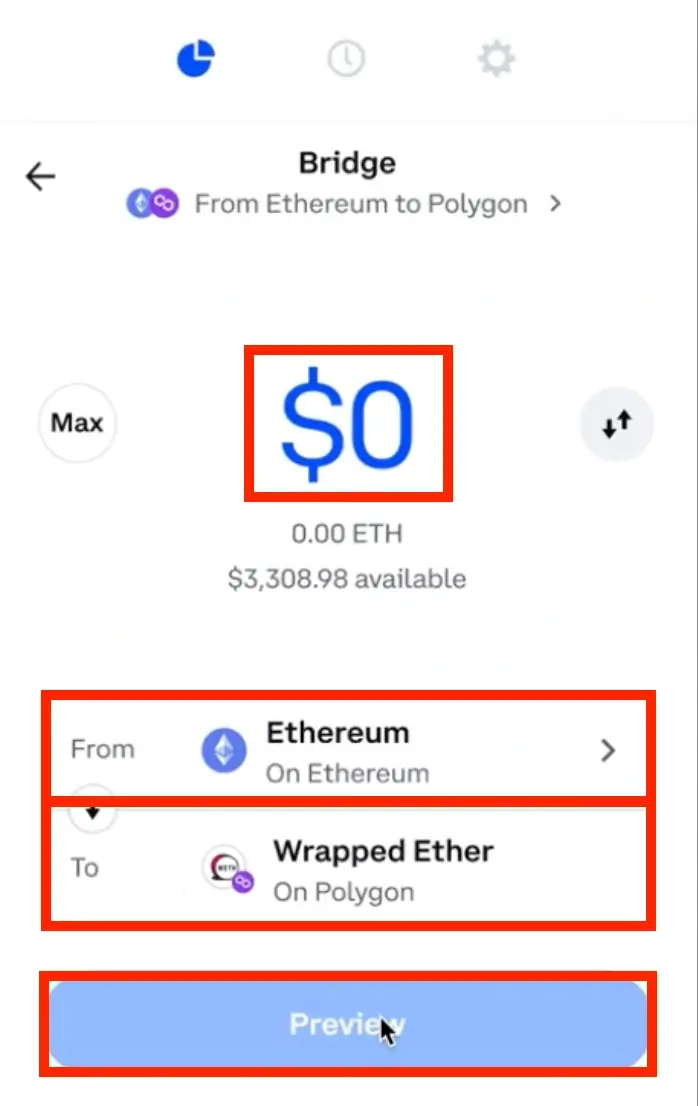
After clicking the “Bridge” button, you’ll be directed to a page where you can pick the networks you want to use. To bridge Binance Smart Chain (BSC) to Ethereum (ETH), choose Binance Smart Chain network from the crypto assets dropdown menu next to “From,” and then select Ethereum (ETH) from the “To” section. Ensure you’ve chosen the proper blockchains. Next, enter the amount of BNB you wish to transfer to the Ethereum mainnet network. Click “Preview” when you’re ready.
Step 3. Review and Confirm
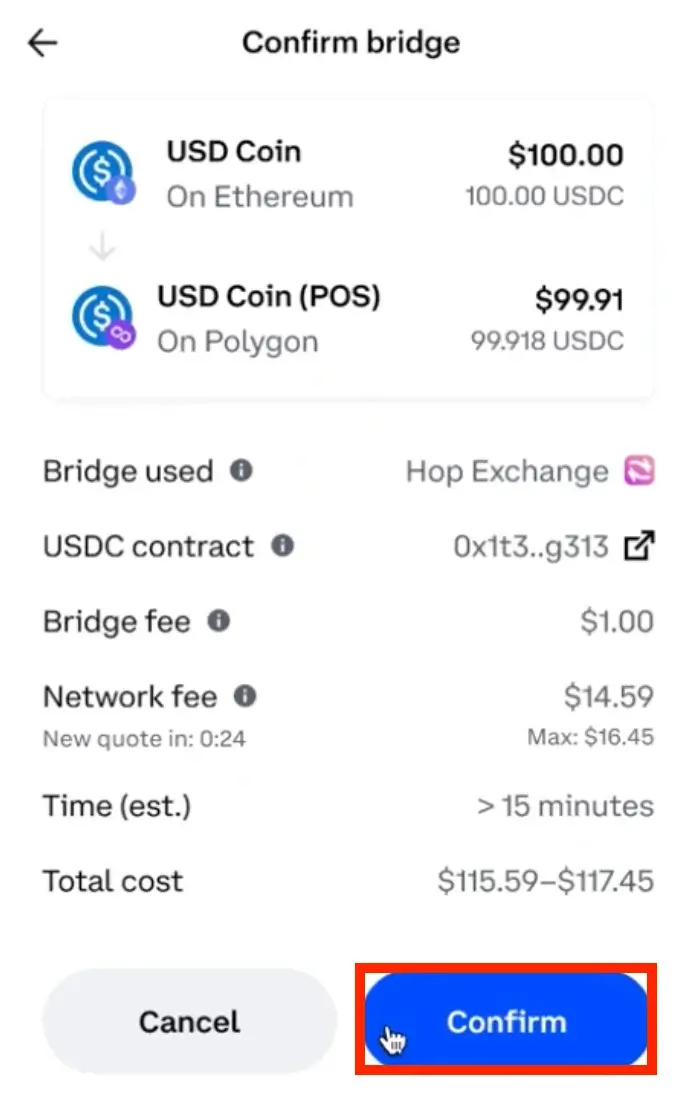
The final step is to review the entered data, including the associated fees and the estimated completion time for the transaction. Remember that you’ll need to pay a gas fee or network fee for the blockchain transaction. If everything looks accurate, click “Confirm” to proceed with the transaction.
Method 3: Bridging via Binance Exchange
The final method we’re introducing, which you can use to move assets from the Binance Smart Chain (BSC) to Ethereum, involves utilizing the Binance exchange directly. To bridge tokens from BSC to Ethereum using the Binance exchange, here’s a step-by-step guide:
Step 1. Initiate the Deposit on Binance Exchange
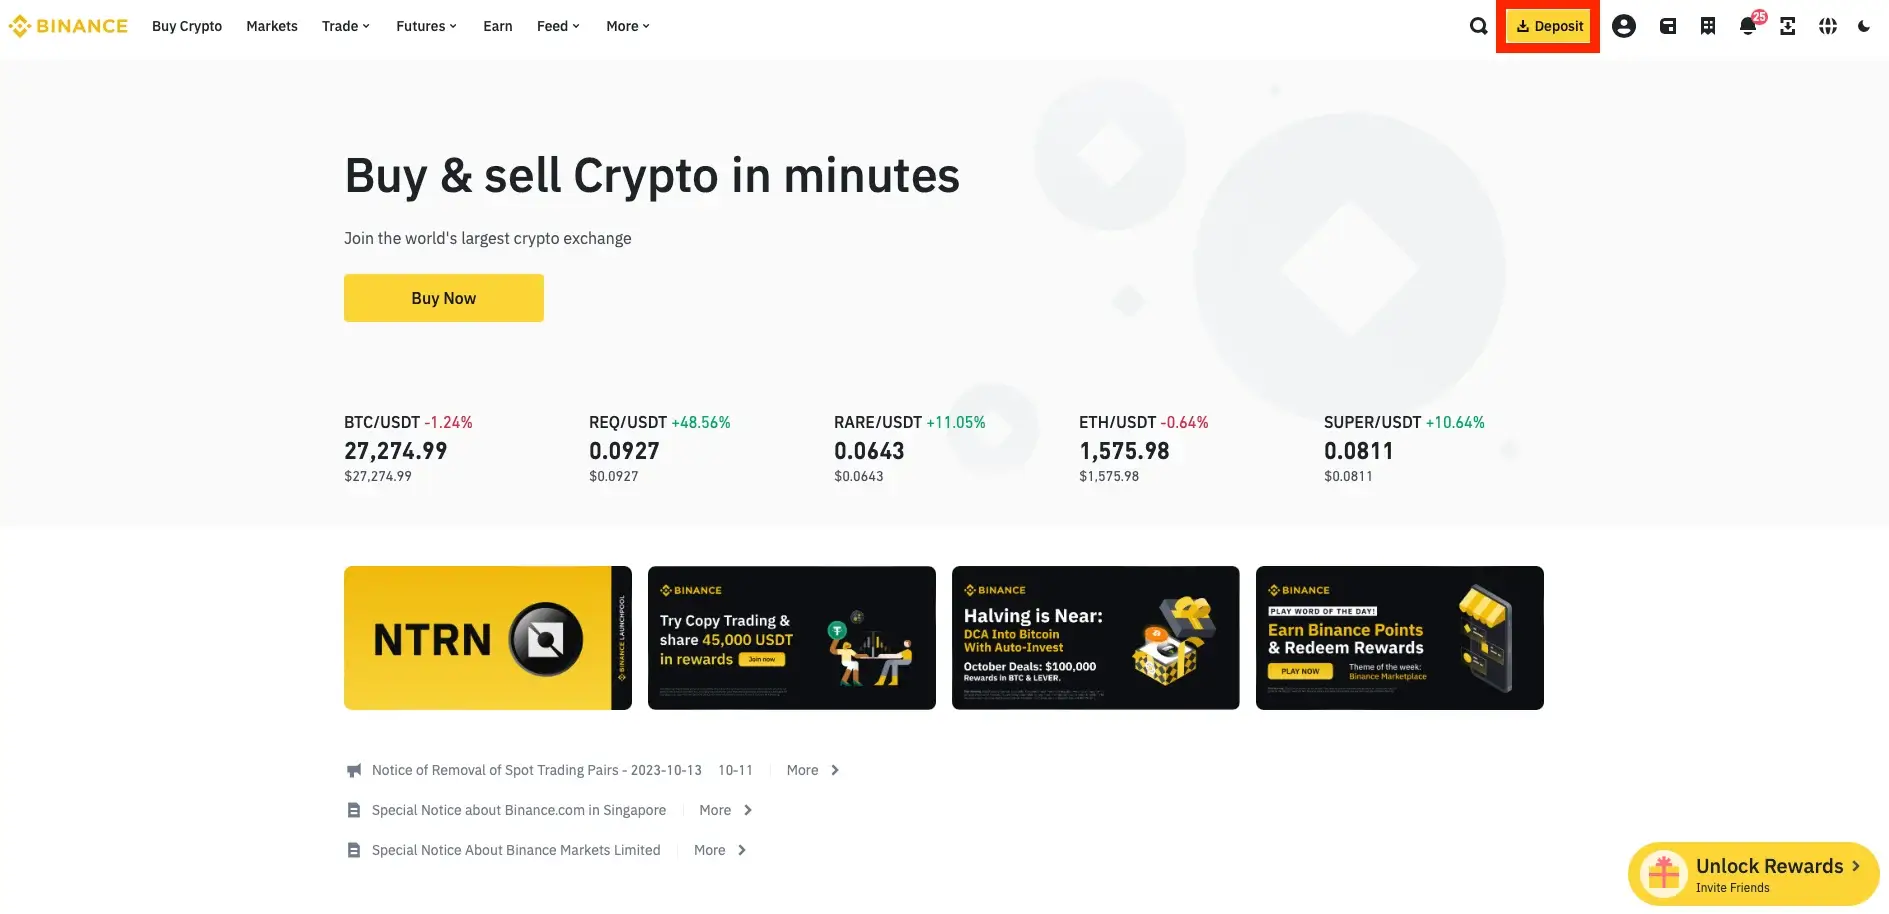
Begin by logging into your Binance account via the Binance website or the Binance mobile app for Android or iOS. Then, click on the “Deposit” button, typically found in the upper-right corner of the main page. As a deposit method, choose “Deposit Crypto.”
Step 2. Select the Token and Network
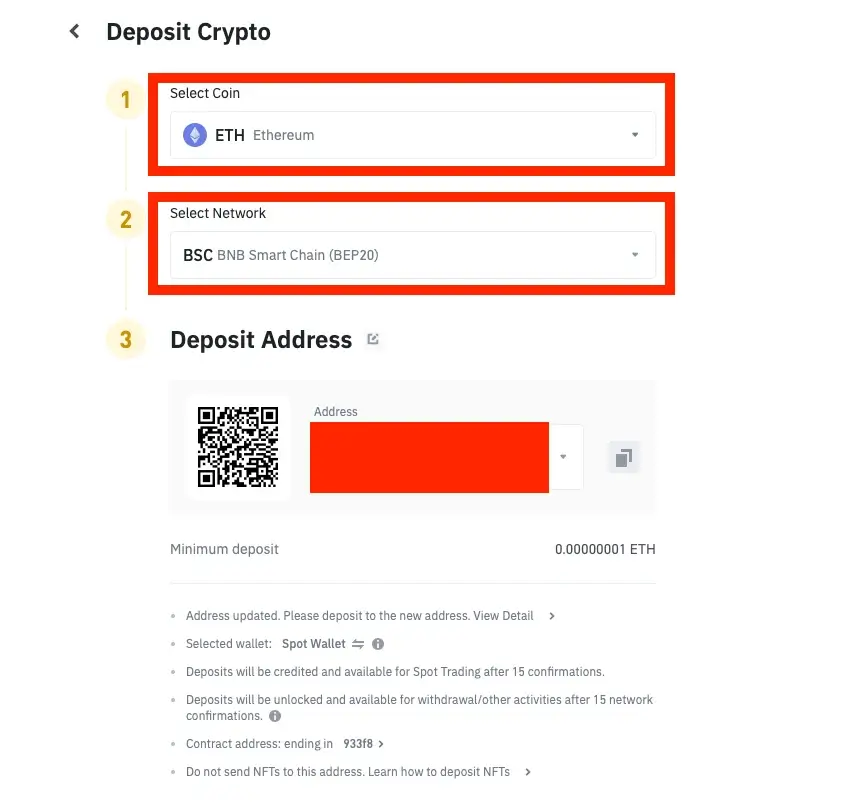
Next, you’ll be prompted to choose the specific coin or token you want to deposit. To bridge ETH from BSC to Ethereum, select “ETH” as the token and opt for the BNB Smart Chain (BEP20) as the deposit network. Don’t forget to copy the BEP20 wallet address provided by Binance.
Step 3. Transfer ETH to Binance Exchange
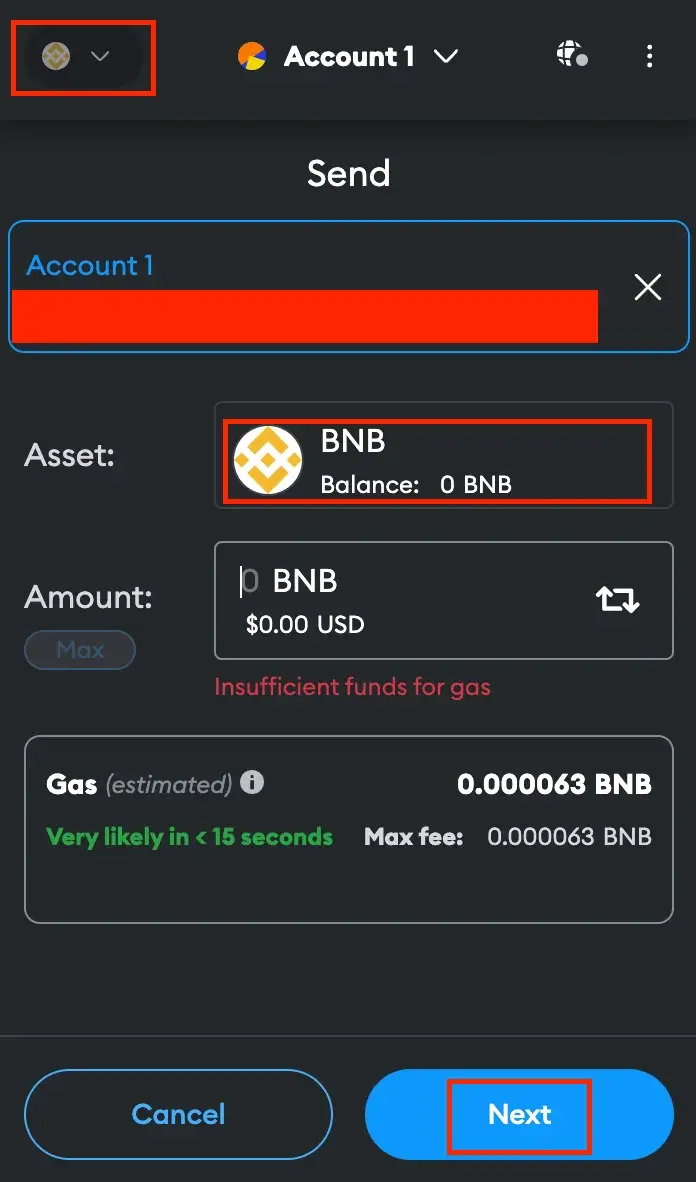
Make sure your MetaMask wallet is connected to the Binance Smart Chain. Then, access your ETH balance and select “Send.” Paste the BEP20-ETH wallet address from Binance, specify the amount of ETH you want to transfer, and proceed by clicking “Next.” Review the transaction details, and when everything appears correct, hit “Confirm” to authorize the transfer.
Step 4. Withdraw to MetaMask on Ethereum

After moving your crypto from MetaMask to Binance, the next step is to withdraw the tokens back to your wallet. However, this time, you’ll use the Ethereum network. Begin by copying your Ethereum (ETH) wallet address from MetaMask.
In Binance, navigate to your Fiat and Spot wallet and select “Withdraw.” Choose ETH as the coin for the transfer. Paste the wallet address you copied from MetaMask and pick “Ethereum (ERC20)” as the network for the transaction.
Enter the amount of ETH you wish to transfer to your MetaMask wallet and click “Withdraw.” You’ll then complete a two-step verification process and conclude by clicking “Submit” to approve the transaction.
Method 4: Using Bridge Aggregators (2026 Recommended)
Bridge aggregators have become the go-to approach for most users in 2026. Platforms like LI.FI, Socket, and Jumper Exchange automatically scan dozens of bridges simultaneously to find the fastest and cheapest route for your specific transfer – often beating single-bridge fees by 30–70% on complex paths. Jumper Exchange alone now supports 60+ chains and processes billions in monthly volume.
Simply connect your wallet, select BNB Chain as the source and Ethereum as the destination, and the aggregator handles everything else. For BSC-to-ETH transfers specifically, aggregators will often route through Stargate or Across Protocol, both of which transfer native assets rather than wrapped tokens – reducing your risk exposure in the process.
What is a Crypto or Blockchain Bridge?
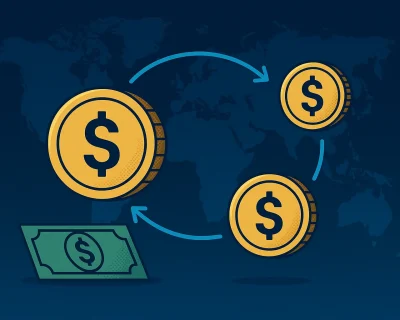
A crypto bridge functions like a digital connector, allowing users to move assets between different blockchains. It enables cross-chain transfers, helping users shift tokens between Ethereum (ETH) and Binance Smart Chain (BSC) without the need to purchase additional tokens.
For example, if you hold USDT on the BSC network but need it on Ethereum, you can use a BSC to ETH bridge instead of repurchasing USDT on the Ethereum Mainnet.
Beyond transferring tokens, newer bridges now support cross-chain messaging, allowing smart contracts on different networks to communicate. This functionality enables unified liquidity, meaning a decentralized application on one chain can tap into liquidity pools on another – expanding DeFi accessibility without manual bridging.
Blockchain Bridges Technical Approaches
There are different technical approaches to cross-chain transfers, with liquidity-based and canonical-based bridging being two common methods.
Liquidity-based bridging involves having liquidity pools of an asset on both the source and destination blockchains.
Canonical-based bridging locks an asset on the source chain and creates a new representation of that asset on the destination chain.
Top Cross-Chain Bridges in 2026
- Stargate (now under LayerZero) – The most widely used bridge for BSC and ETH, now fully integrated into the LayerZero ecosystem after a $110M+ acquisition. Supports 80+ chains and transfers native assets without wrapping.
- Across Protocol – Intent-based bridging with some of the lowest fees available, particularly strong for L2-to-L2 transfers.
- Wormhole – Multi-chain messaging protocol with 35+ chain support, now integrated with the XRP Ledger and approved by the Uniswap DAO for security.
- cBridge – Still a reliable, low-cost option specifically for BSC-to-ETH transfers.
- ChainPort – Fast sub-minute transfers with a 0.3% fee, 30 supported chains, and cold-storage vault protection via Fireblocks.
- LI.FI / Jumper Exchange – The leading aggregator layer, routing across 18+ bridges and 60+ chains in a single interface.
Handling Non-Fungible Tokens (NFTs) with Crypto Bridges
Moreover, crypto bridges aren’t limited to fungible tokens alone. They can also handle non-fungible tokens (NFTs). How’s that? Well, there are two primary models for NFT bridging: pegged NFT bridging and multi-chain native (MCN) NFT bridging.
Pegged NFT bridging mirrors canonical-based bridging, where the NFT is locked on the source chain, and a new NFT representing the locked one is minted on the destination chain.
MCN NFT bridging does not have a concept of an “origin chain” for NFTs. Instead, a “Burn-and-Mint” process ensures that there is always only one NFT across all connected chains.
Trust Levels in Crypto Bridges
Finally, crypto bridges come in different “trust” levels. There are trusted bridges that rely on a central system or entity, requiring users to place their trust in them.
On the other hand, trustless bridges operate solely through automated smart contracts and algorithms.
Types of Blockchain Bridges
Different blockchain bridges serve distinct purposes. Below are the key types:
- Cross-Chain Bridges: Facilitate asset transfers between two separate blockchain networks (e.g., BSC to ETH bridge).
- Sidechain Bridges: Connect a primary blockchain with a sidechain for faster transactions.
- Federated Bridges: Operated by a trusted group that validates asset transfers.
- Hashed Timelock Contracts (HTLCs): Enable secure asset transfers without requiring trust between parties.
- Programmable Token Bridges: Allow smart contract-based transfers, including staking, swapping, and lending.
- Trust-Minimized Bridges: Prioritize security over flexibility, making them ideal for sensitive transactions.
Benefits of Using a BSC to ETH Bridge
Using a bridge BSC to ETH provides the following advantages:
- Improved Scalability & Performance – Reduces network congestion and enhances transaction speed.
- Security & Trust – Utilizes cryptographic techniques for safer transactions.
- Seamless Asset Transfers – Enables frictionless movement of tokens across chains.
- Lower Costs & Faster Transactions – Minimizes fees by eliminating intermediaries.
Risks & Security Concerns with Blockchain Bridges
While blockchain bridges enable interoperability, they also introduce security risks. Some common concerns include:
- Smart Contract Vulnerabilities – Bugs in smart contracts have led to significant exploits.
- Centralization Risks – Some bridges rely on centralized authorities, increasing counterparty risk.
- Liquidity Risks – Low liquidity bridges may result in delays or high slippage fees.
- Phishing & Scams – Malicious websites and fake bridge services pose risks to users.
- Wrapped Token Risk – Bridges that issue wrapped tokens rather than transferring native assets carry an additional risk: if the bridge is exploited, wrapped tokens in your wallet can lose their value entirely. In 2026, protocols like Stargate and Across Protocol mitigate this by transferring canonical, native assets directly.
How to Stay Safe While Using a Bridge Between BSC and ETH
- Verify URLs – Use official bridge platforms.
- Check Smart Contracts – Review audit reports and community feedback.
- Use Reputable Bridges – Platforms like cBridge, ChainPort, and Binance have strong security records.
- Avoid Large Transfers Initially – Test with small amounts before moving significant assets.
FAQ: Common Questions About Blockchain Bridges
Why Do People Bridge from BSC to ETH?
Bridging from Binance Smart Chain (BSC) to Ethereum allows access to Ethereum’s DeFi ecosystem, liquidity pools, NFTs, and smart contracts.
What is the Best Cross-Chain Bridge for BSC and Ethereum?
For straightforward BSC-to-ETH transfers, cBridge and ChainPort remain solid and cost-effective options. However, in 2026, the smartest approach is to use a bridge aggregator like Jumper Exchange or LI.FI – these scan multiple bridges at once and often find cheaper or faster routes than going directly through a single platform.
Is Bridging Crypto Safe?
While blockchain bridges are essential, some have suffered security breaches. Only transfer assets you can afford to lose and use trusted platforms.
Final Thoughts
Blockchain bridges are an essential tool for cross-chain interoperability. Whether using cBridge, Coinbase Wallet, or Binance, ensure you follow the best security practices to safeguard your assets.
The landscape has changed considerably since this guide was first written. The Stargate–LayerZero merger, the rise of intent-based bridging, and the dominance of aggregators like LI.FI have made the process faster and cheaper than ever. That said, bridge hacks remain a major threat – over $2.8 billion was lost to bridge-related exploits in 2025 alone. The core advice hasn’t changed: verify URLs, start with small test amounts, and stick to platforms with strong audit histories and active security monitoring.
Always double-check transaction details, confirm network settings, and use trusted platforms.
The information provided in this article is for educational purposes only and does not constitute financial, investment, or trading advice. Coindoo.com does not endorse or recommend any specific investment strategy or cryptocurrency. Always conduct your own research and consult with a licensed financial advisor before making any investment decisions.