Are you eager to add the Avalanche blockchain to your MetaMask wallet and send AVAX to MetaMask? Look no further! This guide will walk you through a simple, step-by-step process to kickstart your journey.
Follow along, and you’ll be seamlessly integrating Avalanche into your MetaMask in no time. Let’s get started!
Table of contents
How to Connect Avalanche to MetaMask Wallet?
Adding Avalanche to MetaMask is a pretty straightforward process. No matter your background in crypto, it should be easy to add this network to your MetaMask account quickly.
In order to make it simple for you, we will guide you step-by-step through the entire process. For that, we will use the MetaMask browser extension, but remember that even if you opt for the MetaMask mobile app, the process is similar.
Moreover, we will guide you on how to connect Avalanche to MetaMask using 3 different methods:
- Add Avalanche to MetaMask Directly and Manually;
- Add Avalanche to MetaMask Using ChainList;
- Add Avalanche to MetaMask Using Snowtrace.
Remember that if you don’t have a MetaMask account, you must create one first.
1. Add Avalanche to MetaMask Wallet Directly and Manually
Step 1. Connect to Your MetaMask Account
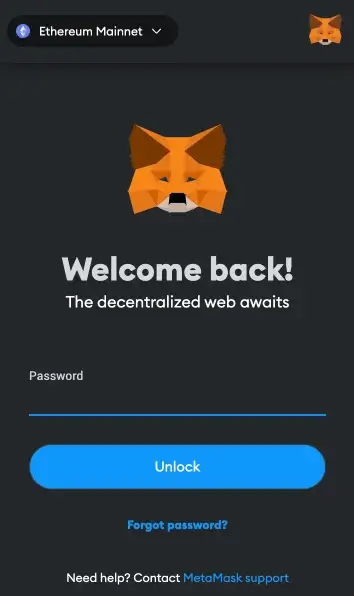
The first thing you need to do is to connect to your MetaMask crypto wallet. Click on the MetaMask icon, enter your password, and unlock your wallet.
Step 2. Select “Add Network” from the Network Drop-Down Menu
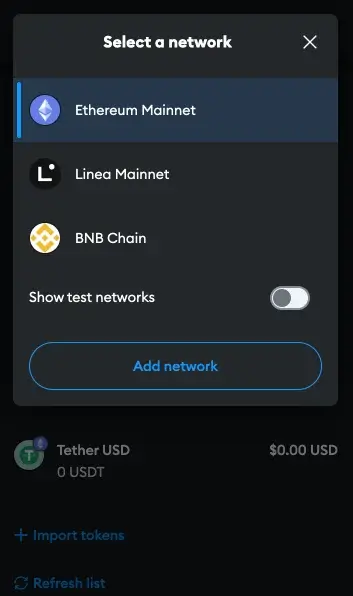
Next, you need to change the network.
MetaMask, being primarily a wallet for the Ethereum network, is preset to work on it. So, to change it, click “Ethereum Mainnet” in the top left corner, and then a new window will open, where you have to click on “Add network.”
Step 3. Search and Select the Avalanche Network C-Chain OR Add the Network Manually
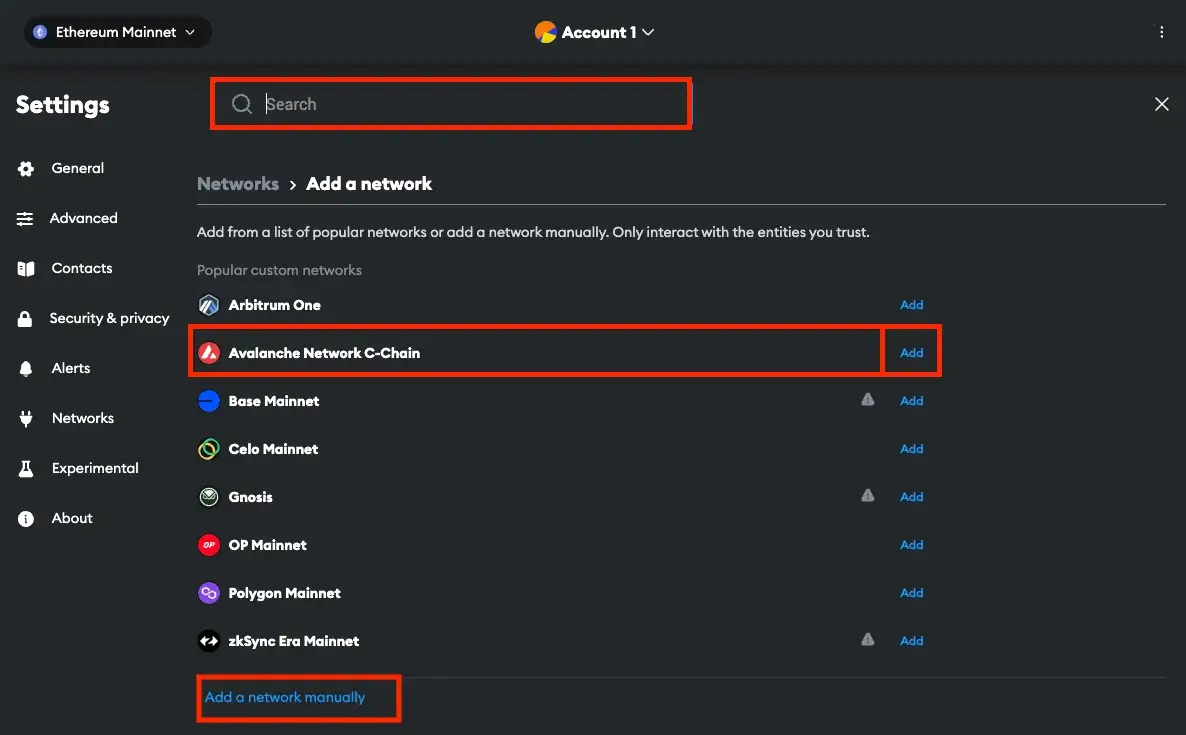
Use the search bar from the newly opened page to search for the Avalanche network.
Your network may appear even without using the search option, as Avalanche is a very popular network among users.
Once you have found your network, click on the “Add” button next to it.
If you opt for the “Add a network manually” alternative, press that button, and to add Avalanche on MetaMask manually, complete the form with the information below:
- Network name: Avalanche Network
- New RPC URL: https://api.avax.network/ext/bc/C/rpc
- Chain ID: 43114
- Currency symbol: AVAX
- Block Explorer URL / AVAX Explorer (Optional): https://snowtrace.io/
Step 4. Press the “Approve” Button
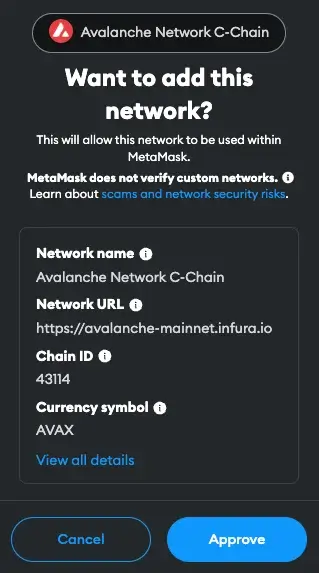
After you press the “Add” button next to Avalanche network, a new window will appear, and you’ll have to press the “Approve” button.
Step 5. Switch to Avalanche C-Chain
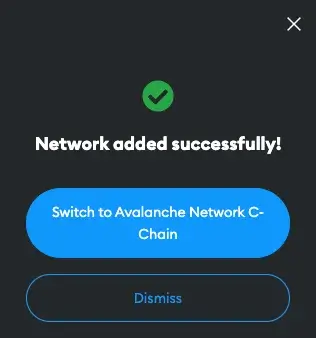
After that, a confirmation window will occur, and you will be able to switch to the Avalanche network c-chain wallet.
2. Add Avalanche to MetaMask Wallet Using ChainList
Step 1. Search for Avalanche Mainnet C-Chain and Press the “Connect Wallet” Button
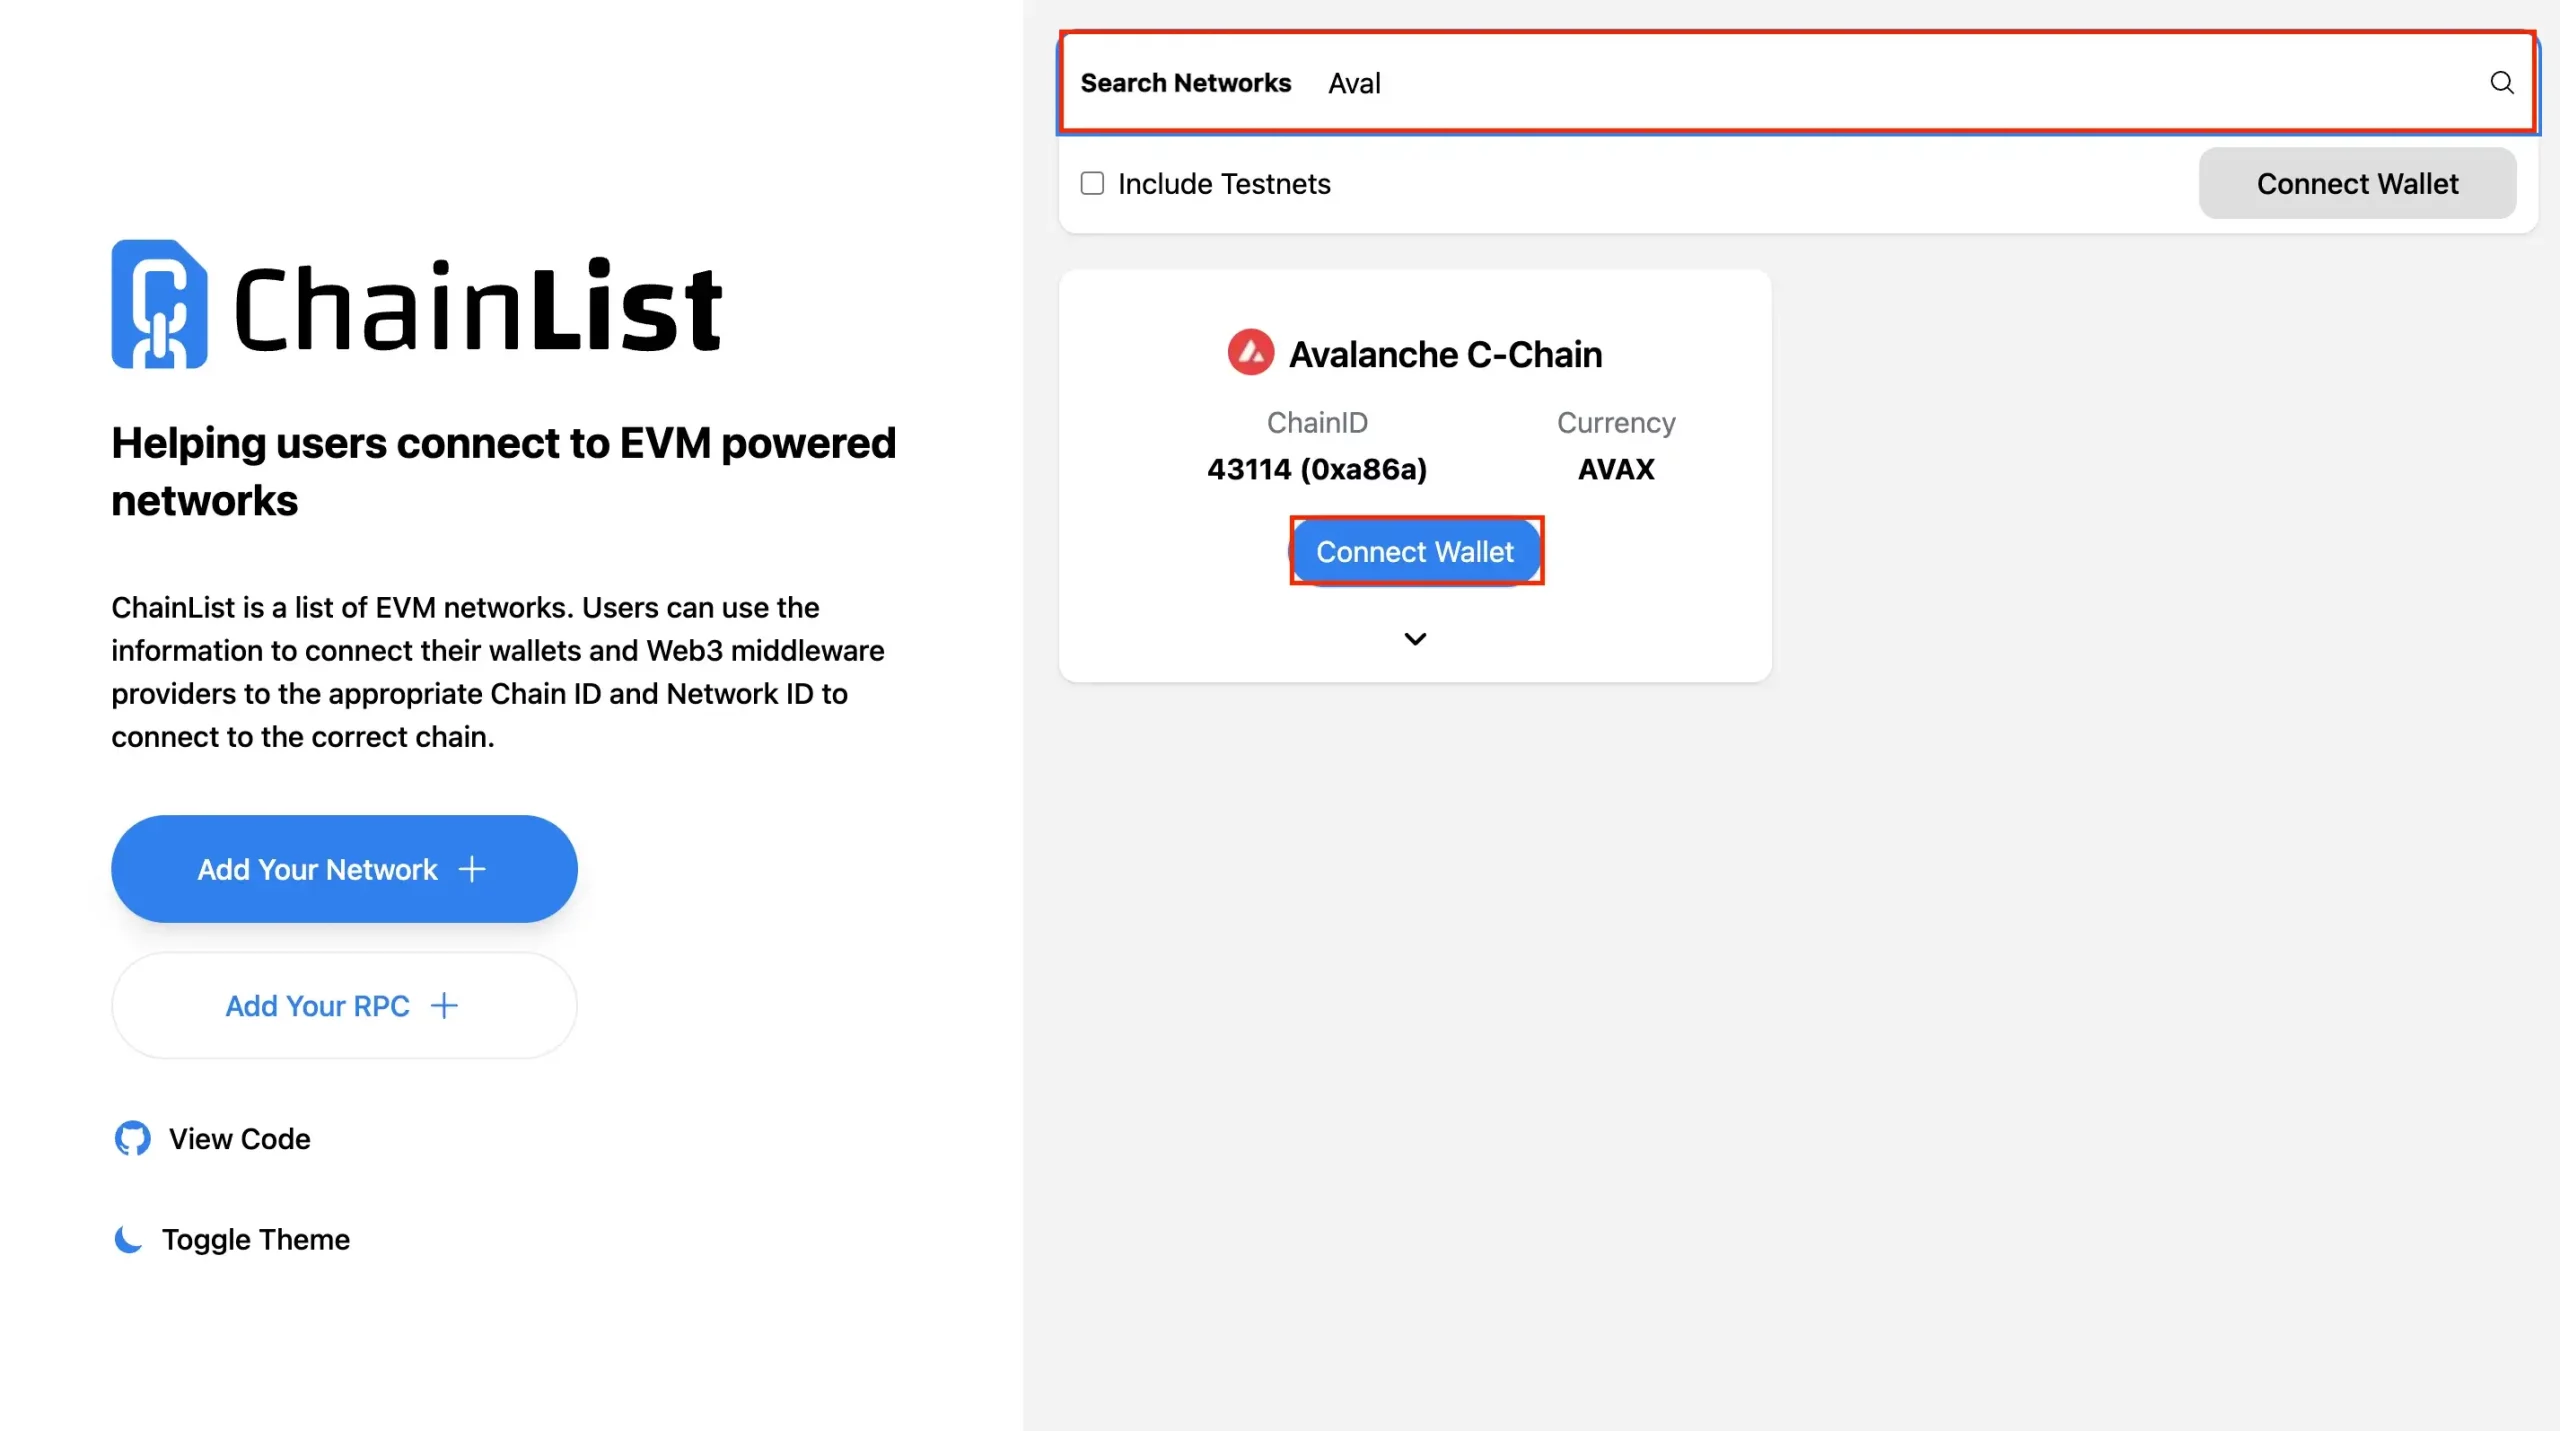
Once you have accessed the ChainList website, you will notice that you have a search bar. In it, search for the Avalanche network.
Once found, click the “Connect wallet” button, and a new pop-up window will open. If no pop-up from MetaMask opens, try using another browser, such as Chrome browser.
Step 2. Press the “Add to MetaMask” Button and Approve the Connection Request
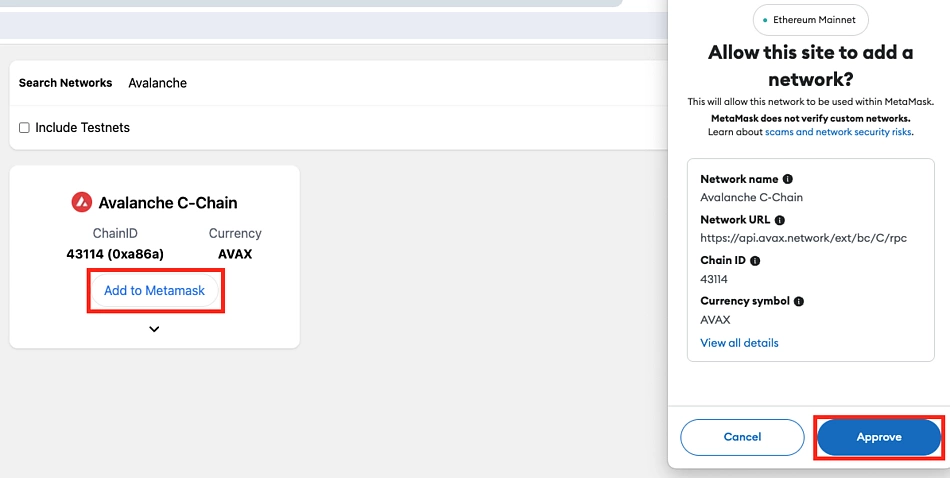
If you are not already connected to your MetaMask account, enter your password and log in, and then allow ChainList to add the Avalanche network to your MetaMask by clicking the “Approve” button.
3. Add Avalanche to MetaMask Wallet Using Snowtrace
Step 1. Press the “Connect” Button
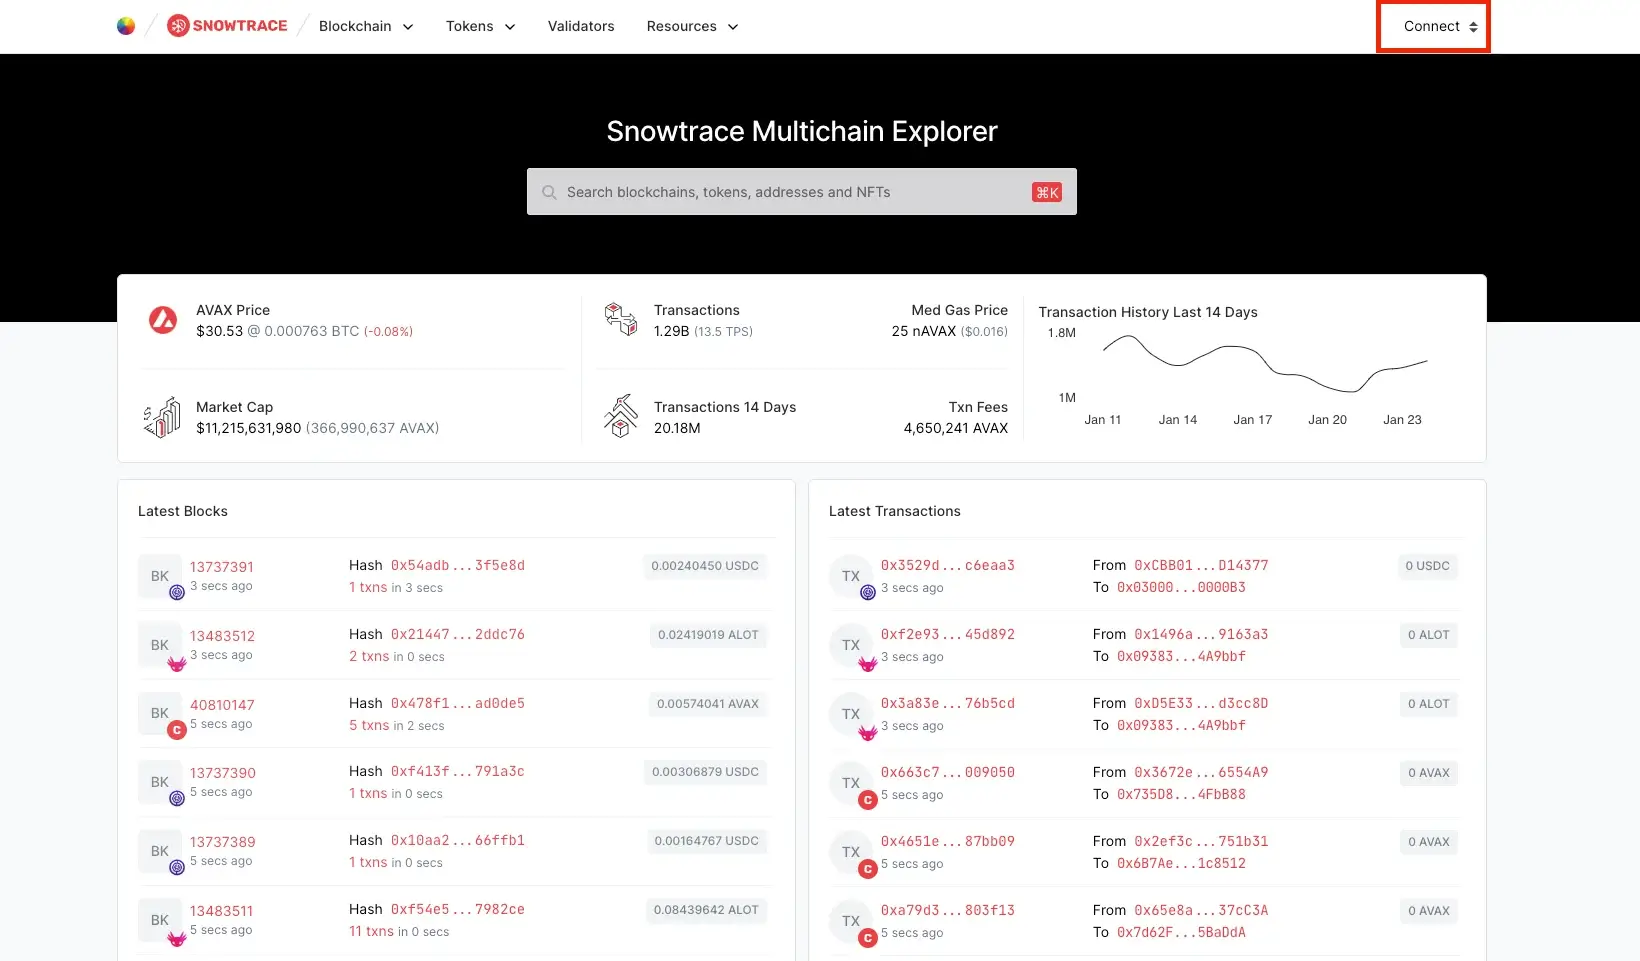
After entering the Snowtrace website, click the “Connect” button in the top right corner, and a new window will appear.
Step 2. Select MetaMask Wallet and Connect to Your Account
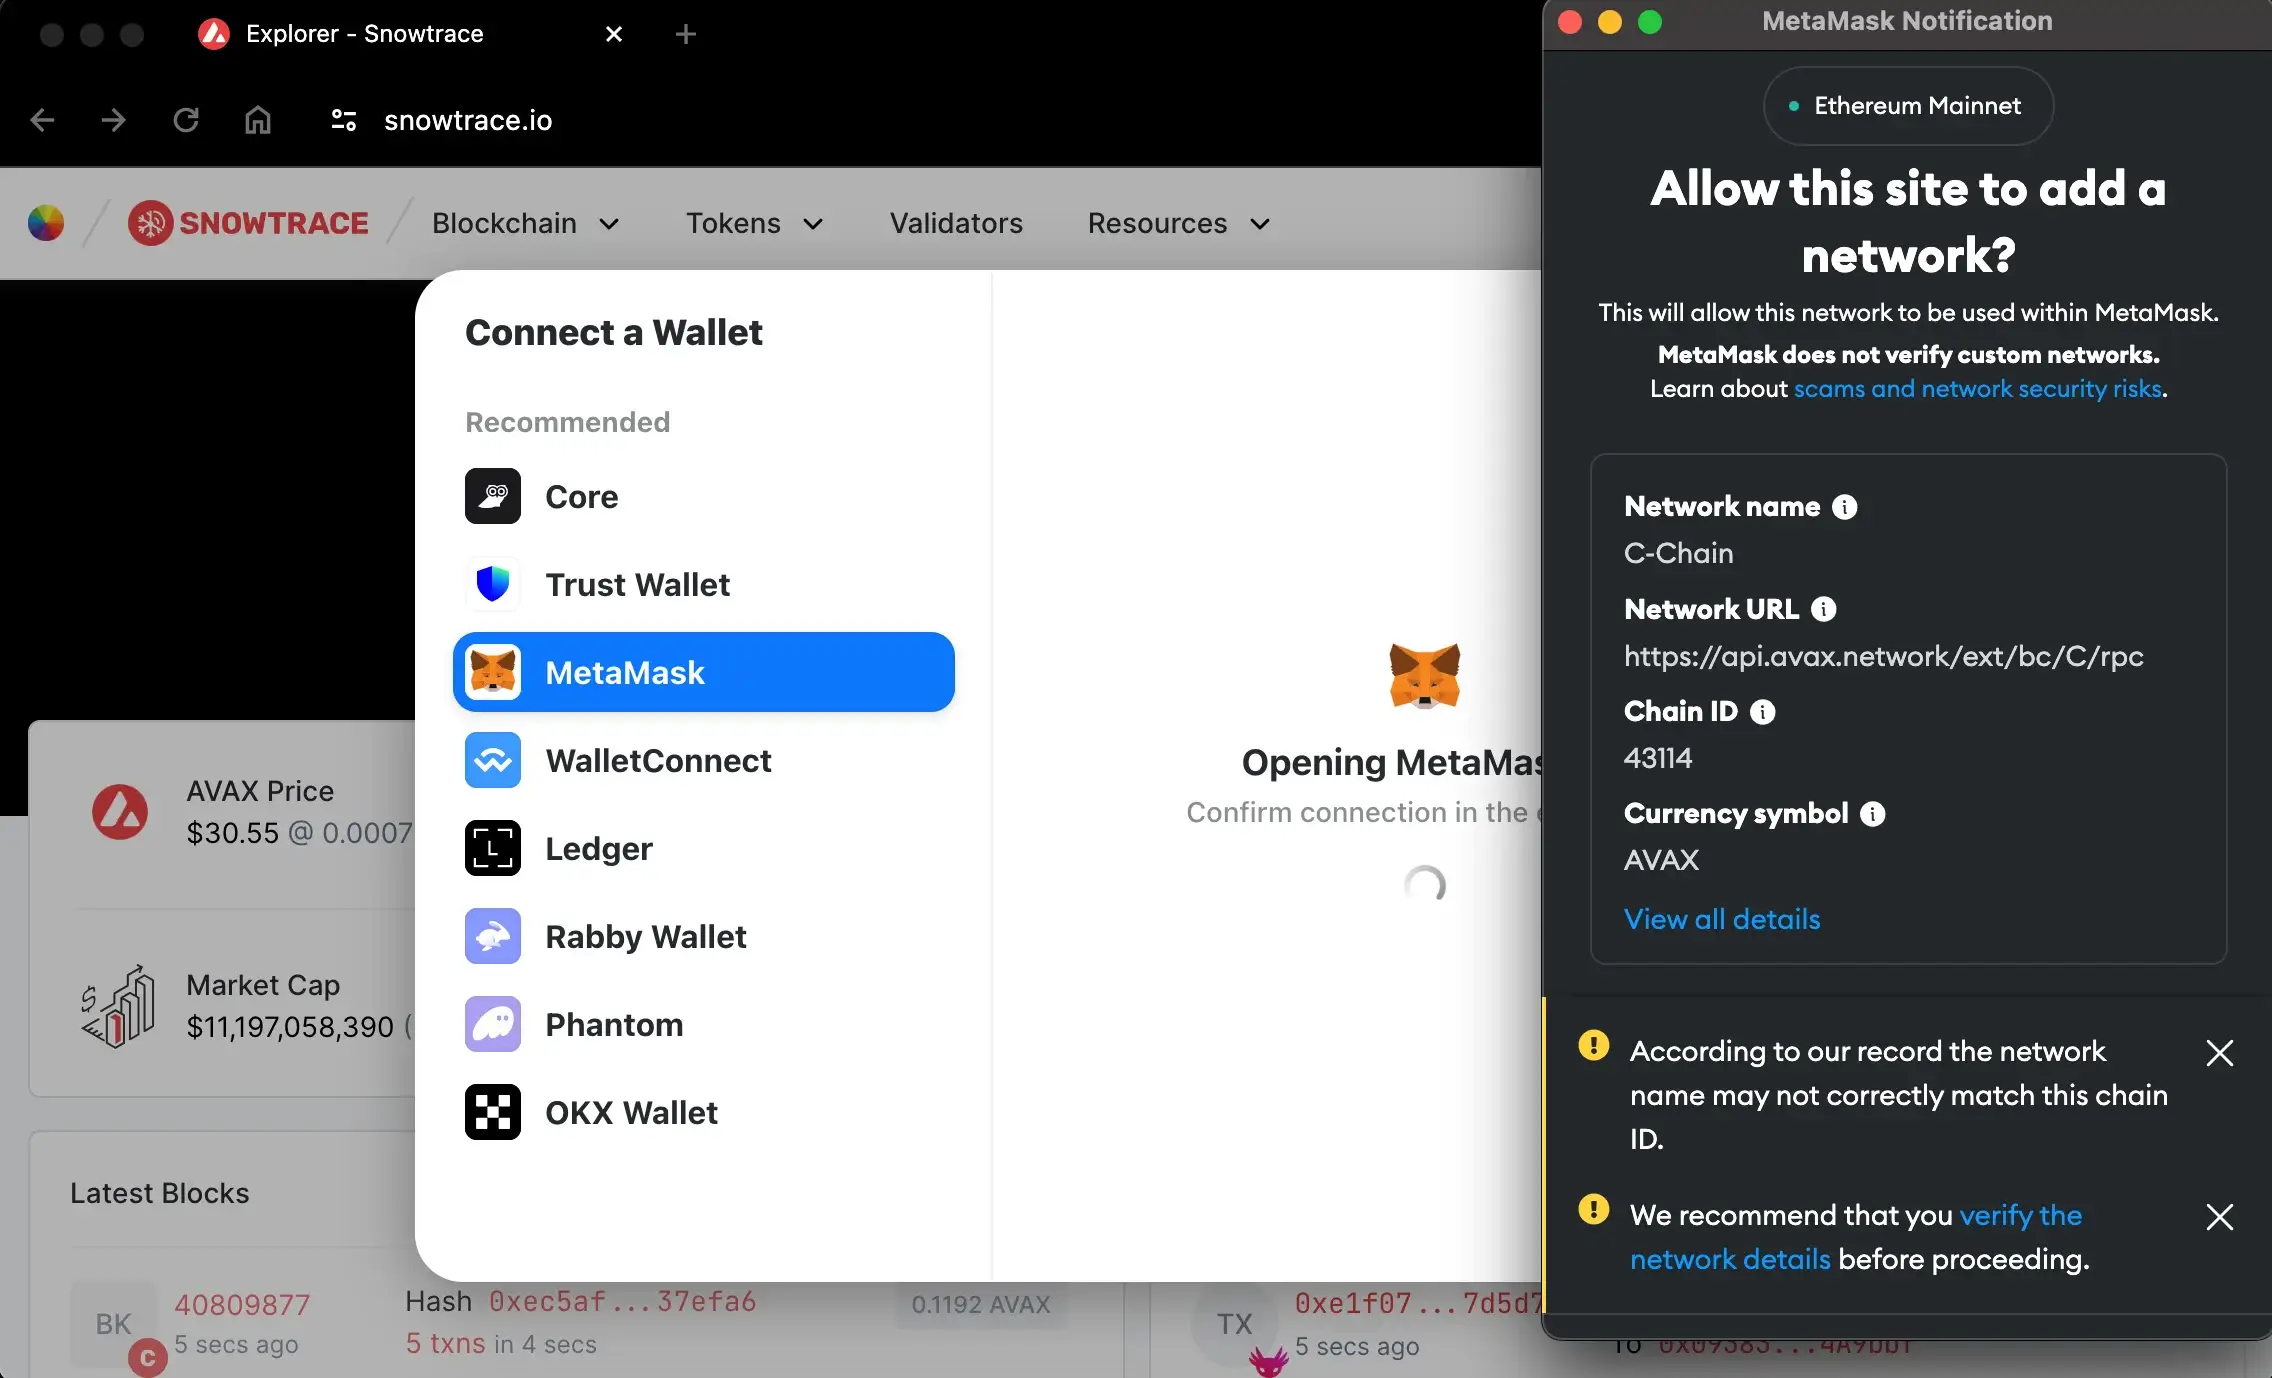
Within this newly opened window, choose “MetaMask,” triggering a pop-up from MetaMask. If the pop-up doesn’t appear, consider switching to an alternative browser like Chrome, where the MetaMask extension is also accessible.
If you are not already connected to MetaMask, provide your login password. Subsequently, permit Snowtrace to add the Avalanche network to your MetaMask by clicking the “Approve” button.
How to Send AVAX Tokens to MetaMask?
Now that you’ve added your Avalanche network to MetaMask, you probably want to transfer your AVAX Tokens to your MetaMask account, right?
For that, we’ll show you how to do it in two ways:
- Send AVAX to MetaMask from Binance Crypto Exchange;
- Send AVAX to MetaMask from Avalanche Wallet.
Also, note that the process is somewhat similar when using other exchanges or wallets.
1. Send AVAX to MetaMask from Binance
Step 1. Connect to Your Binance Account, Go to Your Wallet, and Press the “Withdraw” Button

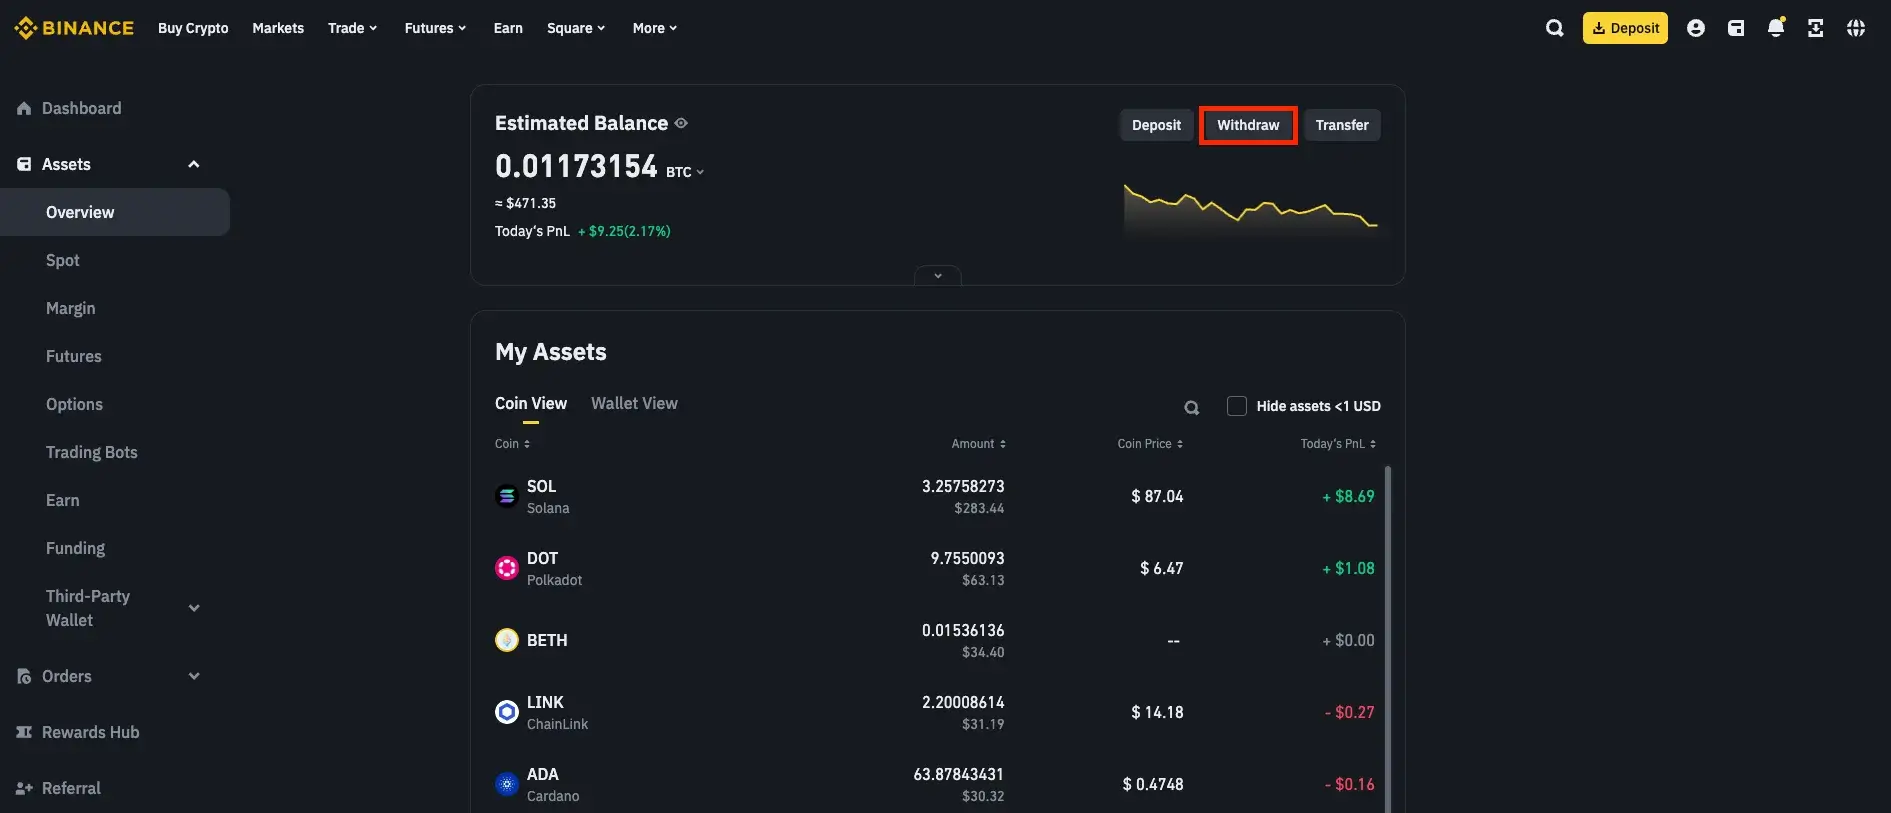
Access your Binance account using your login credentials, including your email and password. Ensure that you complete the Two-Factor Authentication (2FA) process to securely log in to the platform.
After that, find the Binance exchange wallet option by clicking on the icon near your profile at the top right corner. From the dropdown menu, select “Overview” to view details about your cryptocurrencies in the Binance wallet. Click on “Withdraw” to initiate the crypto withdrawal process, specifying that you want to withdraw in crypto, not fiat.
Step 2. Copy the Address of Your MetaMask Wallet
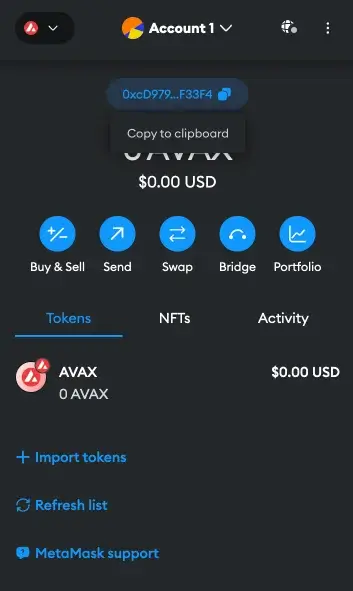
Open another tab and copy your MetaMask wallet address associated with the Avalanche network.
Step 3. Complete the Crypto Withdrawal Form on Binance
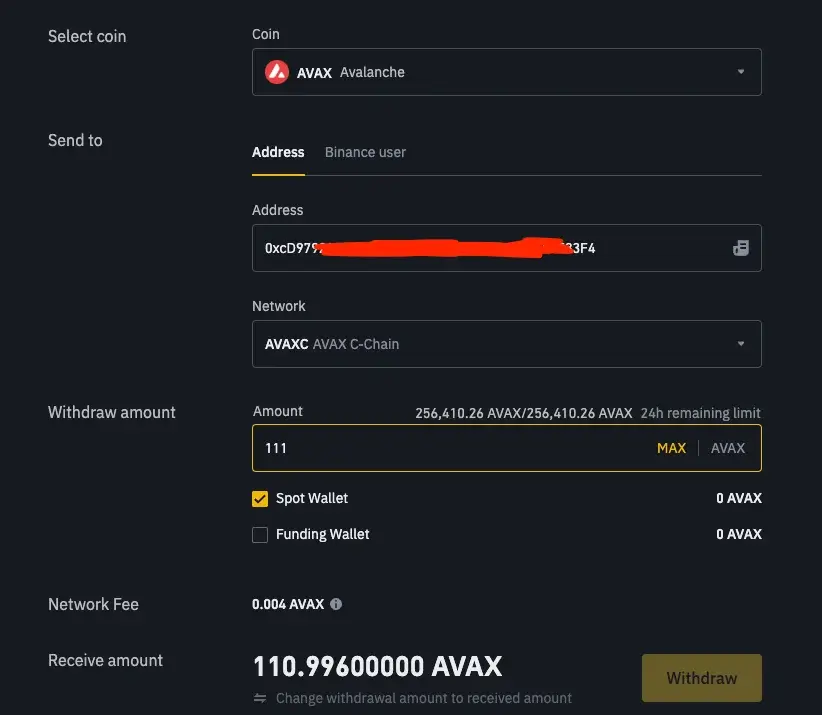
Return to the Binance tab and complete the crypto withdrawal form with the necessary details. Indicate that you want to withdraw Avalanche, paste the MetaMask address, choose the Avalanche C-Chain network from the network name section, and enter the amount you want to transfer to MetaMask.
Step 4. Confirm the Transaction
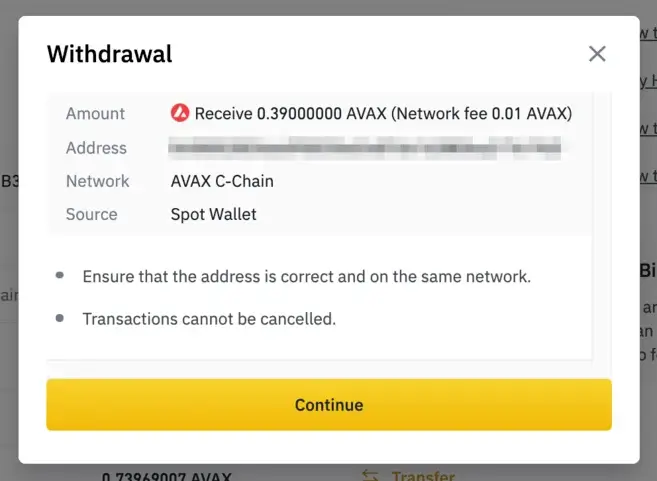
Double-check all entered information for accuracy and confirm the transaction. Once confirmed, your AVAX will be transferred to the specified MetaMask account.
2. Send AVAX to MetaMask from Avalanche Wallet
Step 1. Connect to Your Wallet and Move Your Funds on the C-Chain
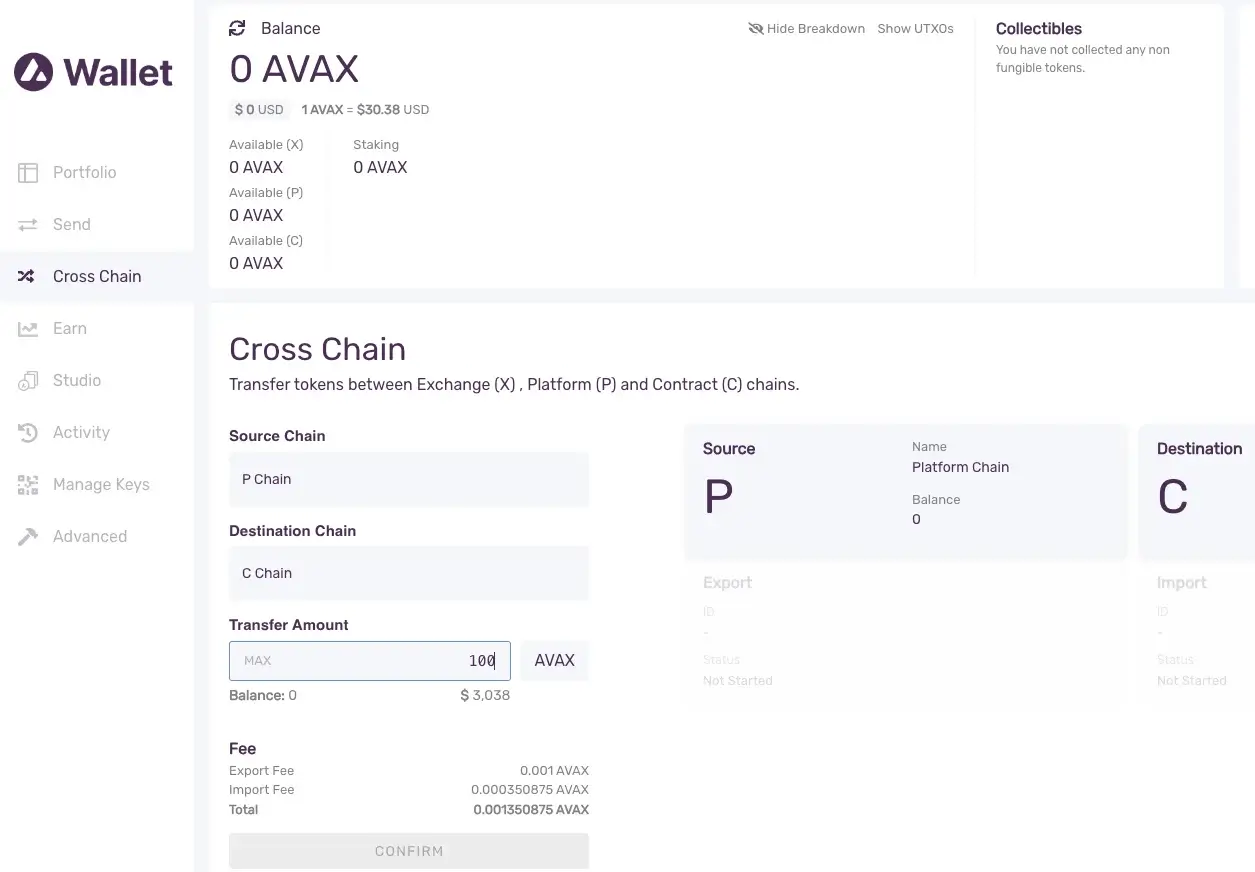
If your money is on P-Chain (Platform Chain) or X-Chain (Exchange Chain) and you want it in MetaMask, first, move it to C-Chain (Contract Chain) because you can do successfully this process if you use only the C-Chain network. To do that, after logging in:
- Choose “Cross Chain.”
- Pick the “Source Chain” and “Destination Chain” (be careful not to introduce a wrong chain).
- Put in the amount.
- Hit “Transfer.”
When it’s done, you’ll get a message confirming it worked.
Once your money is on C-Chain, you’re ready to send AVAX from your Avalanche wallet to MetaMask.
Step 2. Send AVAX to Your MetaMask Address
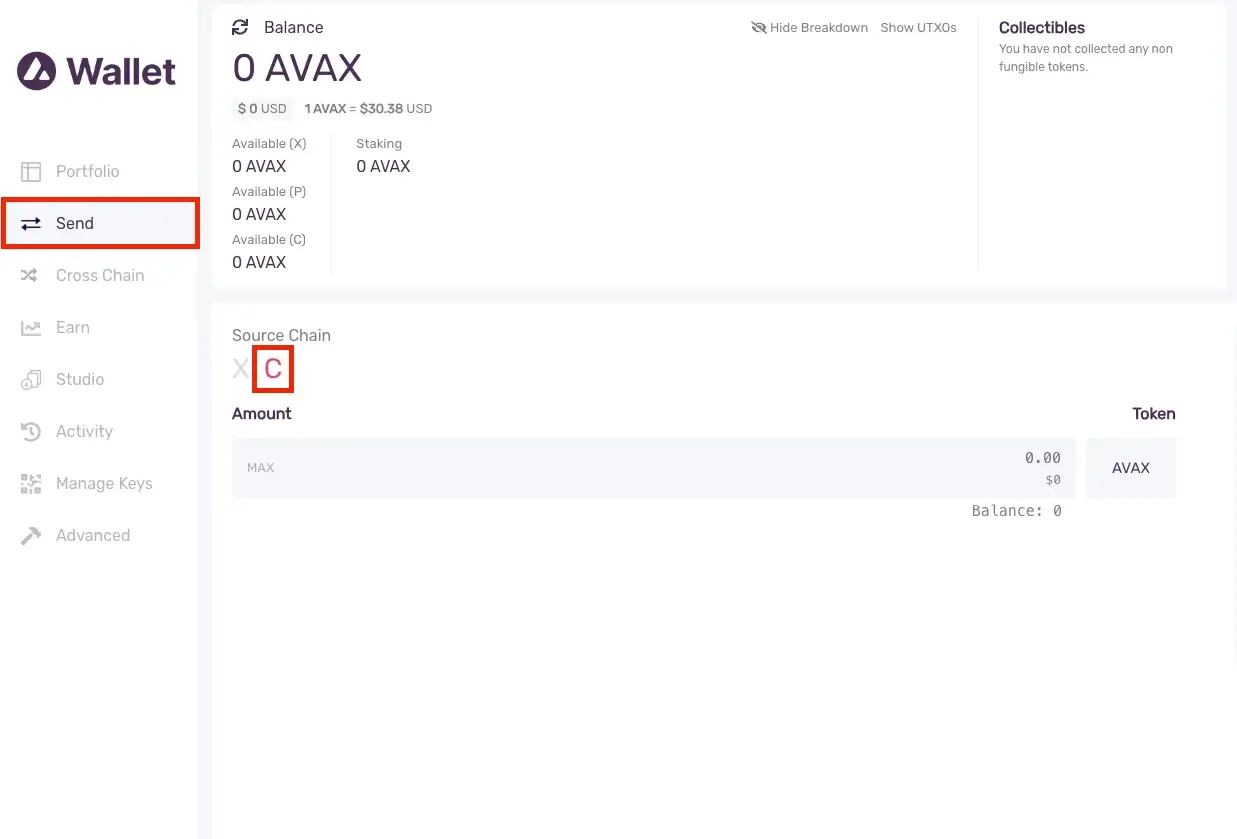
Choose “Send” from the left menu bar.
On the send page, pick “C Contract” as the Source Chain, enter the AVAX amount you want to send, and hit “Confirm.”
Afterward, go to MetaMask, copy the correct address for your Avalanche C-Chain network account, paste it into the Avalanche Wallet, and confirm the transaction. Of course, remember that you will have to pay a small transaction fee.
Other Wallets That are Compatible with the Avalanche Network
Avalanche is a network compatible with many crypto wallets besides MetaMask, whether we refer to hardware or software wallets.
For example, the following wallets are part of the Avalanche-compatible software wallets category and are considered secure:
- Avalanche Wallet;
- Trust Wallet;
- Coinbase Wallet;
- Exodus Wallet;
- Guarda Wallet.
Avalanche-compatible hardware wallets include the following wallets that are also considered secure:
- Ledger Wallet;
- Trezor Wallet;
- SafePal Wallet;
- NGRAVE Wallet;
- ELLIPAL Wallet.
Several other wallets accept Avalanche, but we consider these to be the most secure concerning this network.
About Avalanche and MetaMask
What is Avalanche?
Avalanche (AVAX) is a cryptocurrency and blockchain platform that positioned itself as a contender of Ethereum. As the native token of the Avalanche blockchain, AVAX operates similarly to Ethereum by employing smart contracts to facilitate a range of blockchain projects.
Launched in 2020, Avalanche aims to excel in speed, versatility, security, affordability, and accessibility. It operates as an open-source project, allowing anyone to examine and contribute to the platform’s code.
AVAX serves multiple purposes within the network, including covering transaction processing fees, ensuring the security of the Avalanche network, and serving as a fundamental unit of account across various blockchains within the Avalanche network.
What is MetaMask?
MetaMask is a well-known and widely used crypto software wallet that can be used as a standalone app on iOS or Android devices or as an extension for Chrome, Brave, Edge, Opera, and Firefox.
Since it started in 2016, MetaMask has become really popular, with over 30 million people using it every month by 2024. People love it because it’s safe and easy to use, making it a top choice for those looking for a reliable online cryptocurrency wallet.
MetaMask is a self-custodial wallet where you have full control over your digital money. It supports many different cryptocurrencies, including ERC-20 tokens.
FAQs
Is the Avalanche Blockchain Secure?
Yes, the AVAX blockchain can be considered a secure blockchain. Avalanche’s security can be attributed to the randomized consensus mechanism it employs. The platform asserts that it incorporates robust safety measures, reducing vulnerability to 51% attacks compared to other blockchains.
However, it’s essential to note that blockchains with fewer network participants may be more susceptible to attacks than those with a larger user base.
Is MetaMask a Secure Storage Option for Crypto?
Yes, MetaMask is a secure choice for storing cryptocurrencies. Its use of encryption and user-controlled private keys enhances security. Nevertheless, users should adhere to best security practices to safeguard their assets.
Can MetaMask Receive Avalanche?
Yes, MetaMask can receive Avalanche and other assets on the Avalanche blockchain. You just need to add the Avalanche blockchain to your MetaMask to receive AVAX and other tokens built on the Avalanche network.
Conclusion
So, we hope this guide has equipped you with the knowledge and instructions to seamlessly add the AVAX blockchain to your MetaMask wallet and send AVAX.
As you venture on this user-friendly journey, you’re now well-prepared to explore the exciting possibilities that await. Take the next step confidently and make the most of your crypto experience!